SNMP has a long history with Microsoft Windows. And Microsoft now said that it has been deprecated (moreover, snmp v1 or v2 is less secure than the latest snmp v3, but windows natively doesn’t support version 3 till now) and recommend using CIM for managing hardware and software layers. In this article, we will find the SNMP community string by batch method and powershell method.
SNMP is deprecated. Instead, use the Common Information Model (CIM), which is supported by the WS-Management web services protocol and implemented as Windows Remote Management.
But, there might be Servers/Desktops that still use snmp v1/v2c for monitoring purpose. And, here is the powershell function to get the SNMP Security Settings by reading registry. For each SNMP service options tab, microsoft technet stated that:
- Accepted Community Names . The SNMP service requires the configuration of at least one default community name. The name Public is generally used as the community name because it is the common name that is universally accepted in all SNMP implementations. You can delete or change the default community name or add multiple community names. If the SNMP agent receives a request from a community that is not on this list, it generates an authentication trap. If no community names are defined, the SNMP agent will deny all incoming SNMP requests.
- Permissions . You can select permission levels that determine how an agent processes SNMP requests from the various communities. For example, you can configure the permission level to block the SNMP agent from processing any request from a specific community.
- Accept SNMP Packets from Any Host . In this context, the source host and list of acceptable hosts refer to the source SNMP management system and the list of other acceptable management systems. When this option is enabled, no SNMP packets are rejected on the basis of the name or address of the source host or on the basis of the list of acceptable hosts. This option is enabled by default.
- Only Accept SNMP Packets from These Hosts . Selecting this option provides limited security. When the option is enabled, only SNMP packets received from the hosts on a list of acceptable hosts are accepted. The SNMP agent rejects messages from other hosts and sends an authentication trap. Limiting access to only hosts on a list provides a higher level of security than limiting access to specific communities because a community name can encompass a large group of hosts.
- Send Authentication Traps . When an SNMP agent receives a request that does not contain a valid community name or the host that is sending the message is not on the list of acceptable hosts, the agent can send an authentication trap message to one or more trap destinations (management systems). The trap message indicates that the SNMP request failed authentication. This is a default setting.
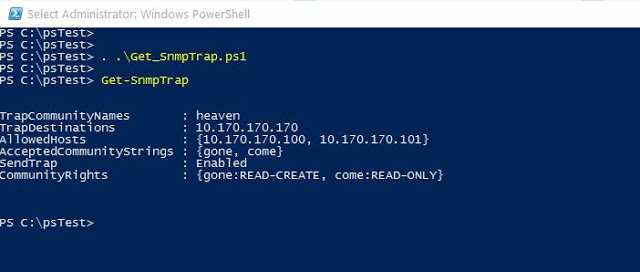
So, let’s make load our function by dot-sourcing the script. Type the following command in powershell.
. .\Get_SnmpTrap
Then, we can call our function. See Fig-1.
Get-SnmpTrap

For multiple machines, you can call the function from inside the invoke-command. See Fig-2. I put some random SNMP settings out-of 3 servers on Virtualbox machines. (To run on multiple computers simultaneously, you will need powershell remoting properly configured. If it is not already configured, you can setup from my quick guide.)

You can download my script from github.
