Winget is available on Windows 10 version 1809 (October 2018 Update) or later. It’s included by default in Windows 10 May 2020 Update (version 2004) and later versions. Upgrading to a supported version is necessary if you have an older Windows 10.
Sometimes, if the winget installation is corrupted due to some reason, you can the latest winget package from the github for installation. Here is how:
Although winget exists on your system, but when you try to run the winget with system account (or using the scheduled task with the system account) and you see this error.
winget : The term ‘winget’ is not recognized as the name of a cmdlet, function, script file, or operable program. Check the spelling of the name, or if a path was included, verify that the path is correct and try again.
If you encounter Windows update error codes, you can check the System log in the Event Viewer, typically under the event source “WindowsUpdateClient” (though it doesn’t provide much info as always 😂). Another place to look is in the “C:\Windows\Logs\WindowsUpdate.log” file for Server 2012R2 / Windows 8.1 and below. For the later Windows version, you will need to use Event Tracing for Windows (ETW) to generate diagnostic logs.
You might have defined the root certificate validity period of Microsoft internal CA as 5 years at initial installation, and what if you want to change the validity period to a longer duration like 10 or 20 years later ? For this, we will need to create a CaPolicy.inf file under windows installation directory (typically C:\Windows) and put some settings and start the renewal process.
The Internet explorer is a bit outdated life-long browser for now. And in this post, I’d like to show some registry tweaks that you can make a bulk computers deployment of page size and font related settings. Below are the topics I cover in this blog.
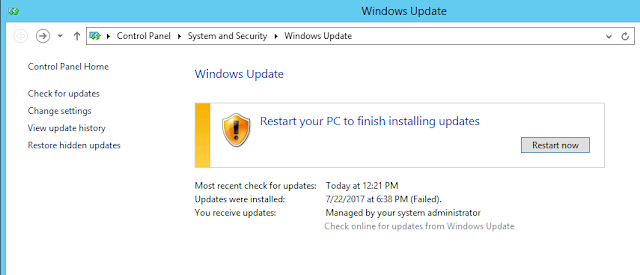
Some windows updates require a system restart after installation because it needs to change some system files which are currently used by running processes, or changes in registry. You’ll be prompted with the yellow icon shield like in fig-1.
Fig-1: Pending Restart after windows update install
Service related operations such as start/stop/restart windows services are usually assigned to Administrators. Sometimes, you might need to delegate these tasks to non-admin users. In this article, I will show the 4 methods to set the service’s permission to any user account/service account. I will use SQL service (MSSQLSERVER) in domain environment.
Method-1: Using Powershell Module (from TechNet Script Repository, easiest but modules are not trusted by Microsoft) Method-2: Using subinacl.exe (from Official Microsoft Download, need to install executable locally on computer, an easy method) Method-3: Using built-in security configuration template in MMC console (do not need to install executable, easy with GUI but more steps are needed) Method-4: Using built-in service control manager command line (difficult, prone-to-errors if manually configured)
Method-1: Using Powershell Module
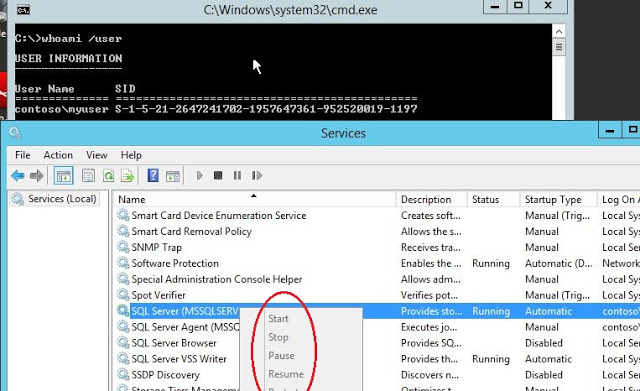
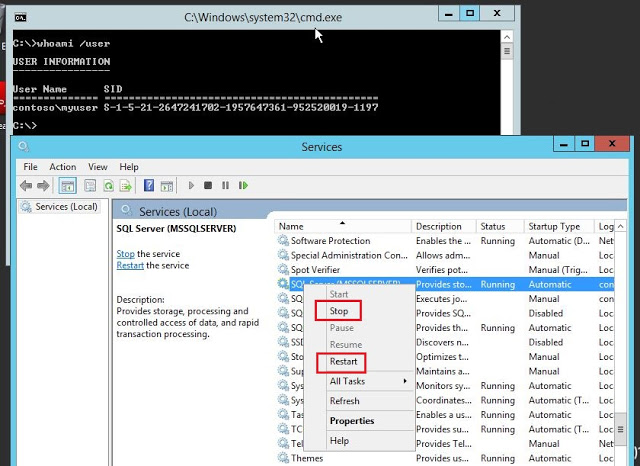
Edit: As of Aug,2021, I found that PowershellAccessControl module is no longer available on microsoft gallery. So, alternatively you can download it from github. Extract the zip file and rename the folder name PowerShellAccessControl-master to PowerShellAccessControl and move it to C:\Program Files\WindowsPowerShell\Modules. Before we start, let’s see the SQL service restart option is gray-out for ‘myuser’. See Fig-1.
Fig-1: Normal user can’t start/stop the service
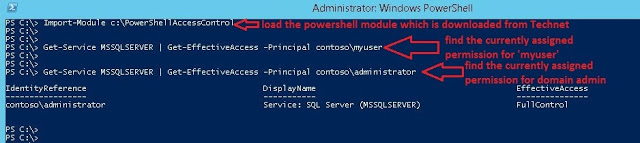
Open the powershell and check the current service permission for ‘myuser’. To do this, make Get-service and pipeline into Get-EffectiveAccess. Type the following command. Get-Service MSSQLSERVER | Get-EffectiveAccess -Principal contosomyuser
You can also check the service permission for domain admin account. Get-Service MSSQLSERVER | Get-EffectiveAccess -Principal contosoadministrator
See Fig-2.
Fig-2: Check the users permissions on SQL service
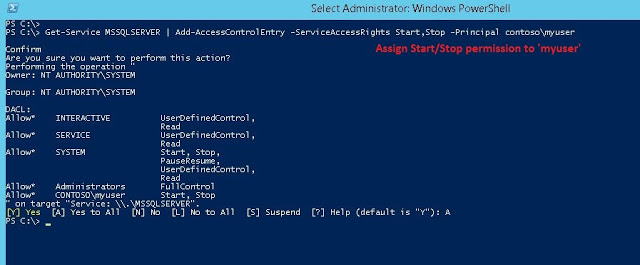
Now, give the user start/stop permission of MSSQLSERVER. See Fig-3. Get-Service MSSQLSERVER | Add-AccessControlEntry -ServiceAccessRights Start,Stop -Principal contosomyuser
Fig-3: Assign start/stop permission to ‘myuser’ in powershell
You can see that the ‘myuser’ now has the start/stop/restart permission on SQL service. See Fig-4.
Fig-4: SQL service can now be stopped
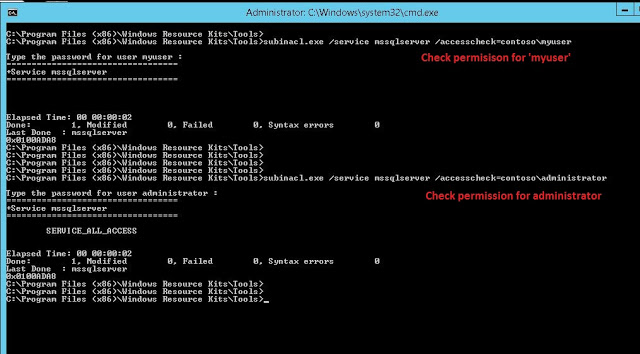
Method-2: Using subinacl.exe
As of Aug,2021, I found that Server 2003 Resource kit is no longer available from Microsoft downloads. So, I suggest you to use other three methods instead of this.
subinacl.exe is a command-line tool that is included in Server 2003 Resource kit. You can separately download it from Microsoft website here.
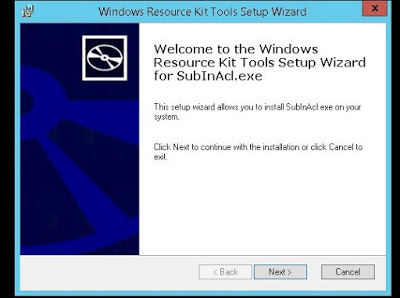
Install the subinacl.msi. See Fig-5.
Fig-5: Install subinacl.exe
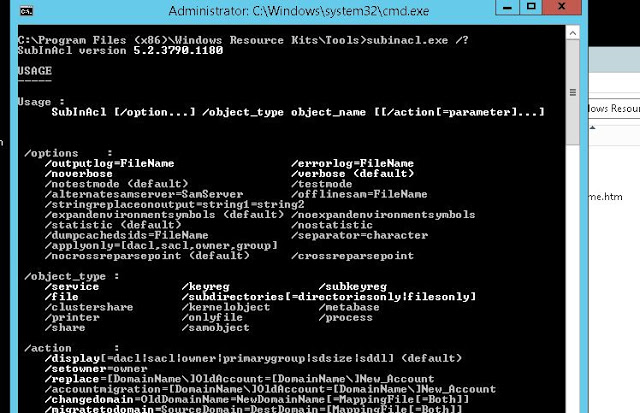
After install is completed, go to the install directory and use subinacl.exe. For help, type subinacl.exe /?. See Fig-7.
Fig-7: Getting help with subinacl.exe
Since we are going to check/assign/revoke permission to sql service. We will use only these commands:
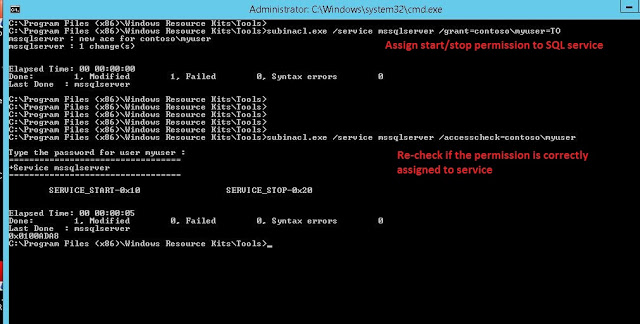
Fig-9: Assign start/stop permission & re-check the permissions
From table, we can see that we have use TO alias in <access> parameter for starting & stopping the service. A full list of ACE aliases can be found here.
Alias
Description
F
Full Control
R
Generic Read
W
Generic Write
X
Generic eXecute
L
Read controL
Q
Query Service Configuration
S
Query Service Status
E
Enumerate Dependent Services
C
Service Change Configuration
T
Start Service
O
Stop Service
P
Pause/Continue Service
I
Interrogate Service
U
Service User-Defined Control Commands
Now, you can start/stop the SQL service !
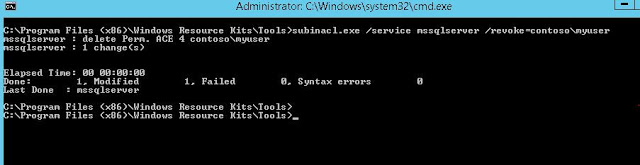
If you want to revoke the permission. You can use with the subinacl.exe command with /revoke switch. See Fig-10.
Method-3: Using built-in security configuration template in MMC console
You can also use local security configuration to assign necessary permissions. These are steps:
Create new security template (in which security settings of service is defined)
Create new security database with newly created security template
Analysis the current configuration with the security database and find the conflicts
Apply the security configuration
1) Create new security template
Create “Security Template” folder under C: where we can save our own security templates.
Open MMC console >> Add/Remove Snap-in >> Choose Security Templates >> Add >> OK
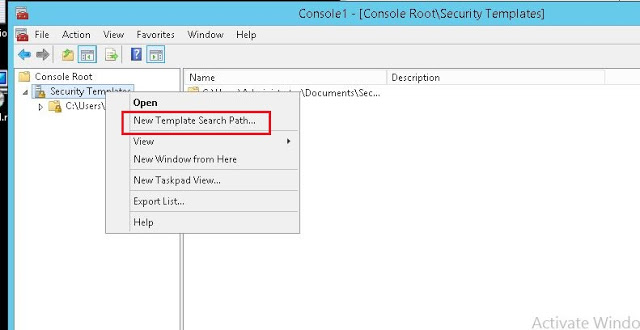
Right-click and “New Template Search Path”. See Fig-11.
Select the location to our newly created folder(C:Security Templates). The path will be listed in console as shown in Fig-12.
Fig-11: Set the new template search path
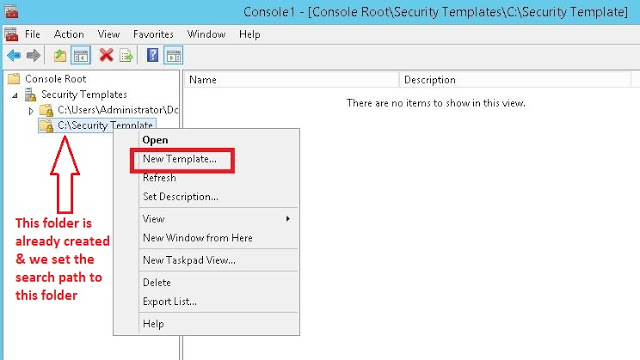
Then, right-click the new node and choose “New Template”. See Fig-12.
Fig-12: Creating new security template
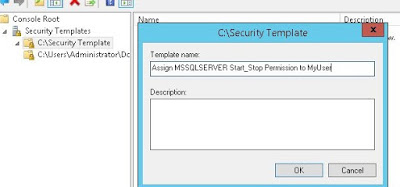
Give the new template name and click OK. See Fig-13.
Fig-13: Give the new template name
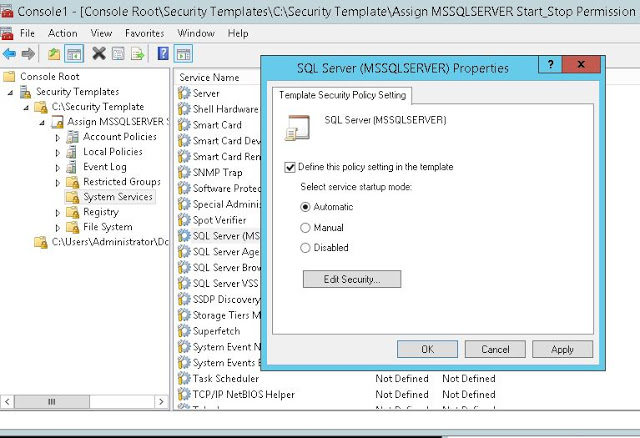
You will see a bunch of security options (the same one you see in Local Security Policy Editor). Since we want to modify the security setting of SQL service, right-click SQL Server (MSSQLSERVER) and click Properties. See Fig-14.
Enable the check box to define the policy. Click Edit Security for more options.
Fig-14: Browse for sql service to edit security settings
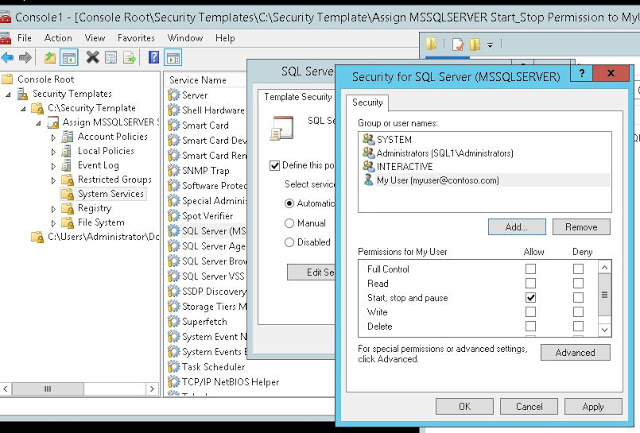
You can see that “System” and “Administrators” already have full permissions. Add ‘myuser’ as new user and select ‘Start, stop and pause’ permission. See Fig-15.
Fig-15: Add new user and set service permissions
You need to save this modified security template. Right-click the template node and save. And the file will be saved as .inf file in your template directory. See Fig-16.
Fig-16: Save the template
2) Create new security database with newly created security template
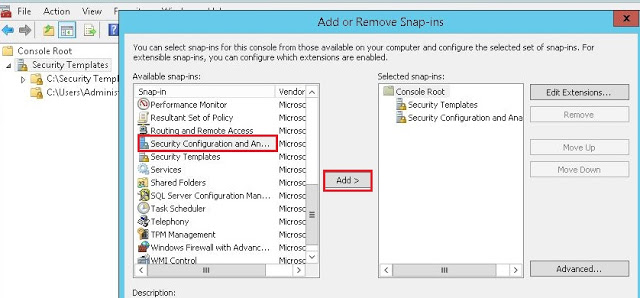
From current MMC console >> Add/Remove Snap-in >> Security Configuration and Analysis >> Add >>OK. See Fig-17.
Right-Click the “Security Configuration and Analysis” node and click open database…
Choose the location you want to save the security database file (I use the default directory “C:Users<myusername>DocumentsSecurityDatabase”). I give the name of the database as “ModifySQLServicePermission”. See Fig-18.
Fig-18: Set location to save the security database & give the file name
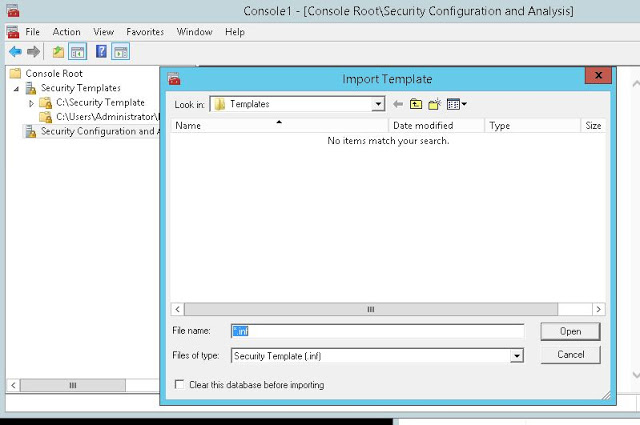
Then you will need to import the template. Choose your saved template which is stored at C:Security TemplateAssign MSSQLSERVER Start_Stop Permission to MyUser. See Fig-19.
Fig-19: Import the security template to use with security database
3) Analysis the current configuration with the security database and find the conflicts
Now, we can analyze your computer security’s setting whether it matches with our newly created security database.
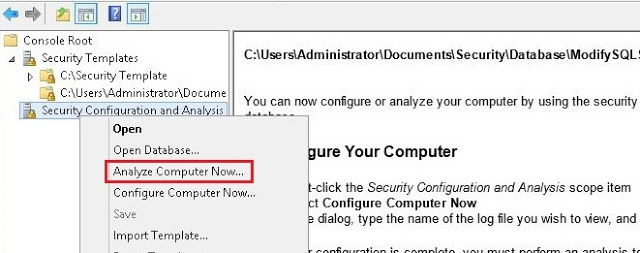
Right-click the “Security Configuration and Analysis” and click Analyze Computer Now….See Fig-20.
Fig-20: Analyze if the current security setting matches with the security database
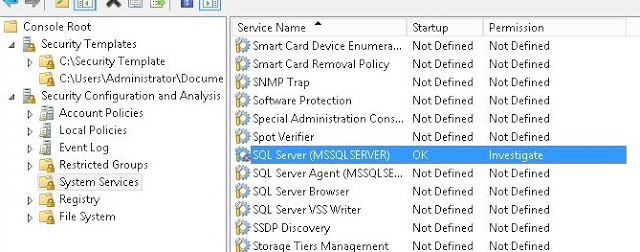
You will see the result tree after analysis is finished.
Go to SQL service and check the result and there you will see the red cross icon which indicates that it conflicts with your current (unmodified) security settings. See Fig-21.
Fig-21: The red-cross shows us the conflicted security settings
4) Apply the security configuration
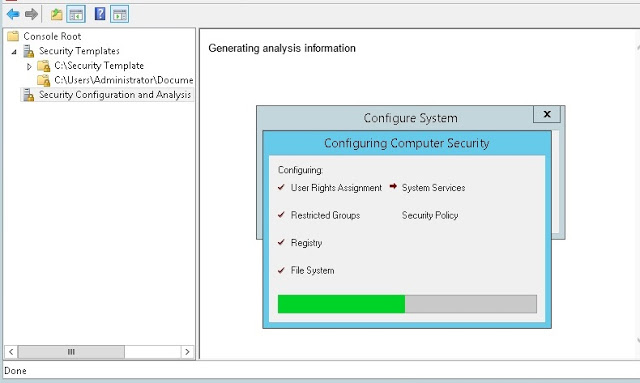
You can now apply the security settings.
Click Configure Computer Now… as shown in Fig-22. You will see the progress status as in Fig-23.
Fig-22: Apply Security Settings
Fig-23: Apply Security settings in progress
Now, you can start/stop the SQL service with our normal user account.
Method-4: Using built-in service control manager command line
In this method, we edit the Security Descriptor of windows service in SDDL (Security Descriptor Definition Language) language. it is a bit difficult to understand if you’re not already familiar to SDDL descriptions. But there is an easy method to do this, which will be explained here. (I have written the another blogpost to explain the details of modifying these access control lists with example).
Here, you need to use sc.exe to check/get/set the service permissions. Its syntax is:
sc.exe sdshow <myservice>Find the current security settings
sc.exe sdset <myservice> <securitySettingsInSDDLformat> Set the security settings
So, we will check the current permission of SQL service by the following command.
sc sdshow myssqlserver
Fig-24: Check the initial service security stings
Then, you need to generate the new security descriptor using the same method as we do in previous method with MMC console.
Open MMC Console
Add “Security Templates” and “Security Configuration and Analysis” Snap-ins (Fig-11)
Set the template path, create new template with desired settings and save the template (Fig-12,13,14,15,16)
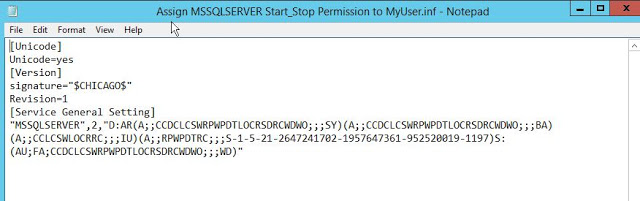
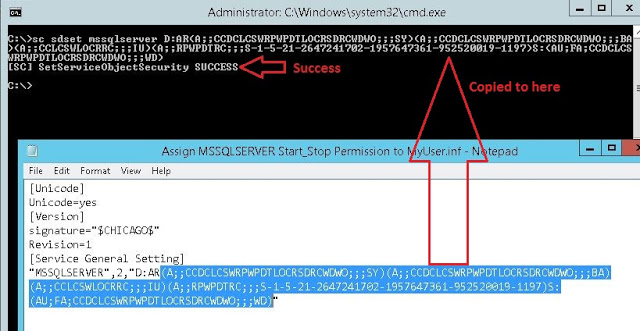
There is an .inf file in your saved location. Open the file and you will see entries as the below one. See Fig-25.
You will see there is an extra entry compared to our initial result which I highlighted in red color. This is the added user permission to start/stop the SQL service followed by user’s SID.
Note: You can also get the user name back from this SID by the following command (optional, just for knowledge)
wmic useraccount where sid=”S-1-5-21-2647241702-1957647361-952520019-1197″ get name,sidNow, I can set this new permission with sc.exe sdset<newSDDL> command. See Fig-26.
Fig-26: Set the new permission with sc.exe sdset
The command completes successfully. And user now has start/stop permission on SQL service. See Fig-27.
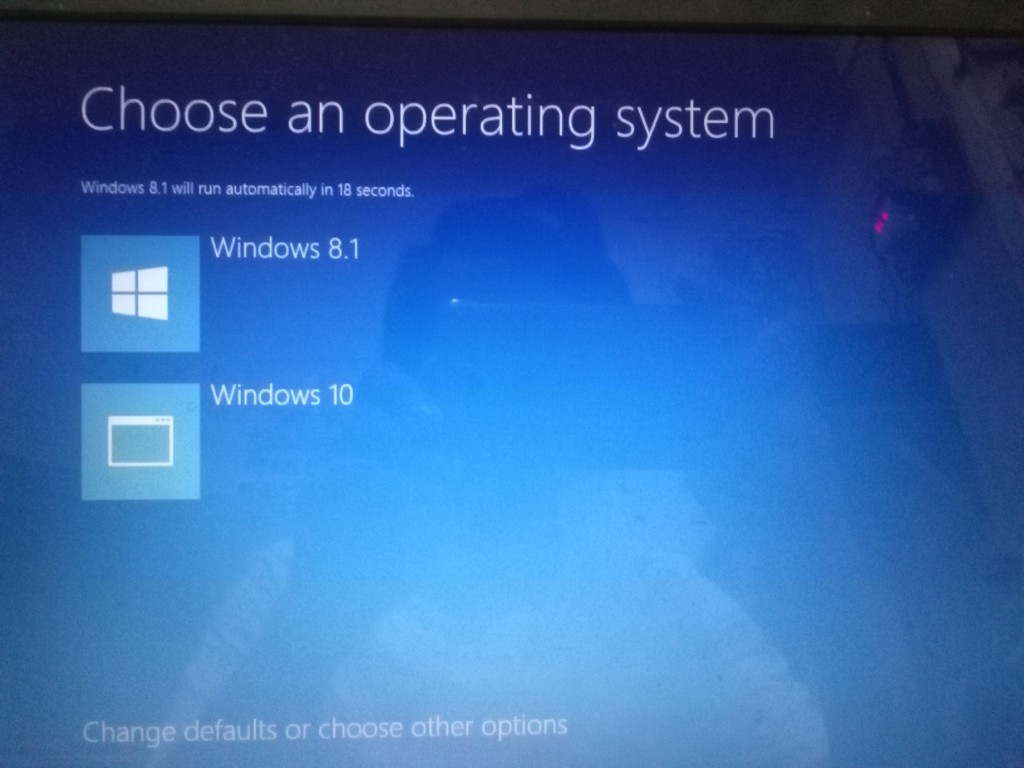
Recently I installed windows 8.1 along with existing windows 10 on my free partition. After reboot, the dual boot option gives me 30 second time-out with the default to windows 8.1 as seen in Fig-1. As I worked with Win-10 most of the time, I need my computer boot directly into windows 10 with less time-out. Since Windows Vista and later, windows shipped with bcdedit.exe which gives enhanced user option to edit the BCD Store (Boot Configuration Data, formerly called boot loader) before calling the windows kernel.You can read a complete windows boot process from the following articles. https://social.technet.microsoft.com/wiki/contents/articles/11341.the-windows-7-boot-process-sbsl.aspx https://technet.microsoft.com/en-us/library/ee221031(v=ws.10).aspx
Note: There are many third-party tools if you prefer GUI for this task. EASYBCD has a free (also has a paid version), one of the popular BCD editor tools to work with dual boot systems.
Fig-1: Default is Window 8.1 and 30 seconds time-out
bcdedit.exe has a good many parameters for boot configuration tasks. Check a full list of bcdedit.exe commands with: bcdedit.exe /? bcdedit.exe <parameter> /?
1) Backup before you do anything Like editing registry, you will need to backup the current configuration to avoid unexpected failures. First, create the backup directory under C: and run bcdedit with /export. See Fig-2. bcdedit.exe /export c:bcdbackup
Fig-2: Backup the BCD Store
2) Check the Current BCD setting You can check the current bcd setting with /enum and /v parameters. As, you can see the default id is {d22d3d4f-c6d9-11e6-bf59-d680d7abcd65} which is Windows 8.1. We need to change this id to the windows 10’s id in the next step. See Fig-3 for all OS lists in the boot menu. bcdedit.exe /enum /v
Fig-3: Enumerate all the Boot Options
3) Change the Default OS and Time-Out Settings As talked, we need to change the default OS Identifier to {6aea34be-2dec-11e6-9221-9292a8212aa0} which is Windows 10. Also, we want to decrease time-out to 5 sec. Type the following commands one-by-one (replace xxxxx with your own OS id). ** Note that you may see different id for your OS, not the same one here. So, do not copy & paste these commands ** bcdedit.exe /default {xxxxxxxx-xxxx-xxxx-xxxx-xxxxxxxxxxxx} bcdedit.exe /timeout 5
So, for my case, my Windows 10’s id is {6aea34be-2dec-11e6-9221-9292a8212aa0}(check Fig-3). So, I need to type: bcdedit /default {6aea34be-2dec-11e6-9221-9292a8212aa0} bcdedit /timeout 5
Fig-4: Change the Default Boot OS & Time-Out Settings
4) Check your settings & Reboot (optional) Now, you can check your setting with the same command. See Fig-5. bcdedit.exe /enum /v
Fig-5: Check the setting after changes
You can reboot now (or later) to see the results. See Fig-6.