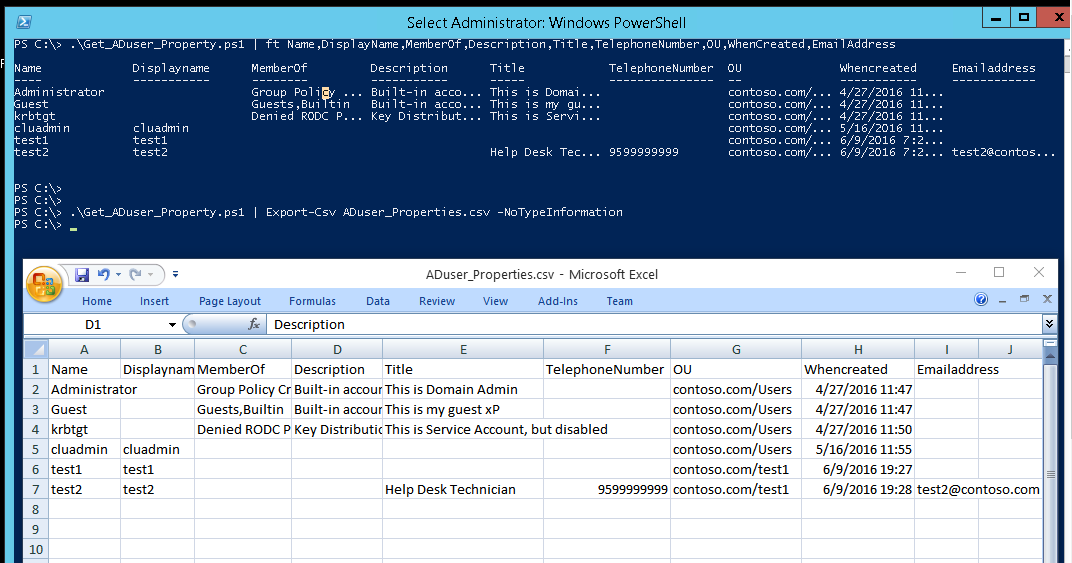
It’s a one-liner command that I use to find the most common AD attributes including the Creation date, Member Of and OU location. I attached the screenshot as example.
These days, I have been looking for a way to find which running processes on my machines are accessing the internet without my consent. And fortunately, I found a script from TechNet Gallery written by Cookie.Monster. The script extract the connection info from netstat command and create Custom Object for further processing. So, I just changed the by adding some regx to find the public IP addresses. For testing purpose, I use the TeamViewer on my machine. Continue reading “Powershell: Find Which Running Processes are Connecting to the Internet”
Update: The purpose in this blogpost is about giving permission of specific windows service to specific monitoring user. So, you can replace step-6 (setting DNS service permission to specific account that will monitor service) with easier methods in my new blog post.
There are three methods for monitoring windows servers:
By installing Agents (such as Zabbix,SCOM Agents).
SNMP v1,v2, v3 regardless of platforms.
WMI Monitor for windows servers.
And today, I’m going to make the WMI monitoring in a couple of steps, plus how to monitor the missing windows services that is unavailable in the default monitor method. Here, I’ll use the Microsoft DNS Server as a monitoring client for DNS Service + basic resource monitoring.
Things that I used in this tutorial:
Server 2012R2x64bit, named as “DNS-test.contoso.com”
Solarwind Server and Application Monitor(in a Trial version), on the server named as “monitor.contoso.com”
Note:Although you can give the full administrator permission for WMI monitoring if you want to save yourself from some headaches, it’s highly not a recommended way to do so. Therefore, let’s see how we can do with the principle of least privileges for WMI monitoring.
Read This Please: Some part of this tutorial contains modifying system services’ security permission (here is the DNS service) which might be critical if it is in production systems . I tested solely purposed for my lab. And, I’m not guaranteed that it works on your environment with the expected results.
Step-1:Install the pre-requisites, and what’s next …?
Install Windows Server 2012R2 and DNS Role (you can use any other OS versions starting from Server 2003SP2)
Also, I installed the trial version of SolarWinds Server and Application Monitor for testing purpose. However, you can use any monitoring software that supports WMI Monitoring method.
These installation steps are easy enough, so I don’t go into details.
Step-2: Permission is needed for WMI to allow remote users.
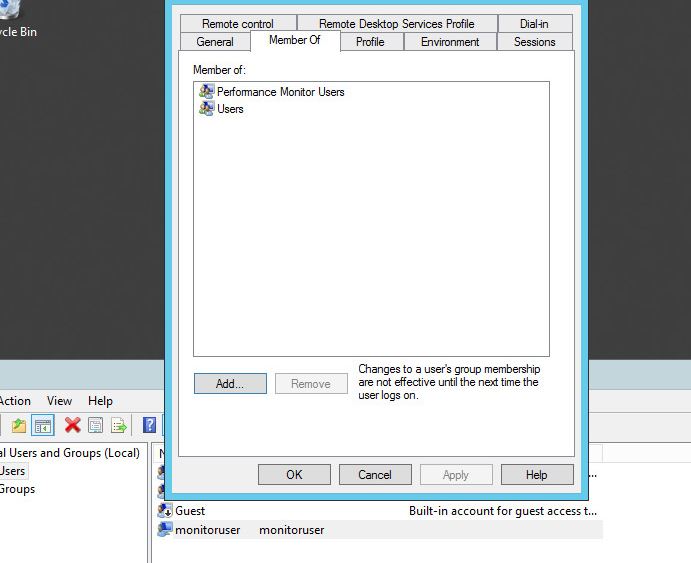
I created one user account for monitoring services, “monitoruser” and added it to the group “performance monitor users”, since I’m planning to give the permission to that group and not directly to that user.
Fig-1: Create monitor user and add to Performance Monitor Users group
After that we have to give the permission to query the wmi classes, which is the Microsoft Management Framework,since Windows 2000 to touch system classes and hardware in an abstract model.
So, I give the permission here. See the figure-2.
In the Run box type wmimgmt
In the console, right-click Properties > Security > Root >> CIMV2 > Add Performance Monitor Users > Check the Enable Account and Remote Enable
OK, Save the settings
In the console, right-click Properties > Security > Root >> MicrosoftDNS > Add Performance Monitor Users > Check the Enable Account and Remote Enable
OK, Save the settings.
Note:Most Windows Services and namespace lies in CIMV2, so it is necessary to give the permission to access these components.
Fig-2: Add permission to WMI Namespaces
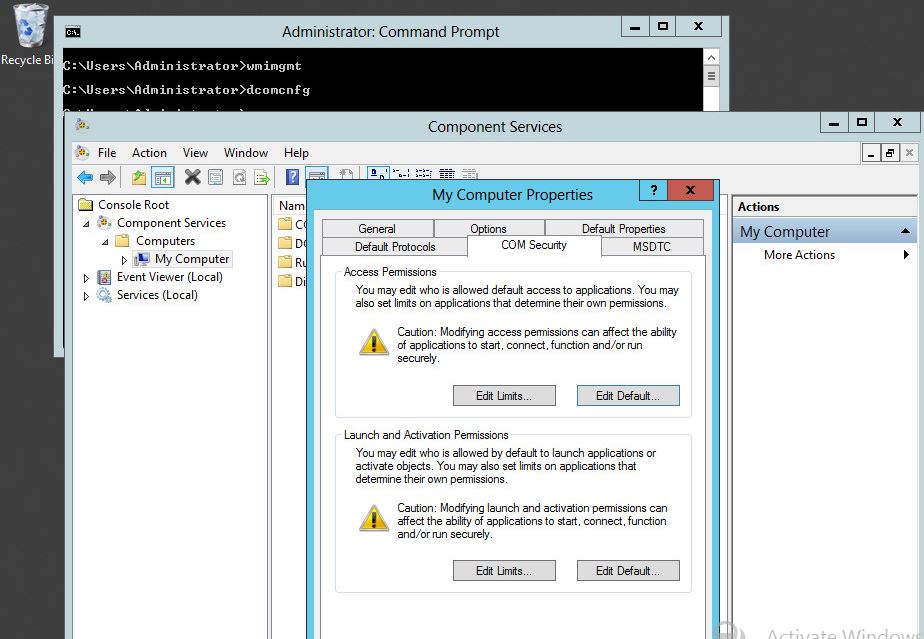
Step-3: Give some permissions to DCOM also.
In this step, we will give the permission to access the DCOM, the Distributed Component Object Model which is used to communicate the software components among Distributed Computers.
In the Run box type dcomcnfg and press enter.
In the console, Right-click My Computer > Properties > COM Security and give permissions to Access Permissions and Launch and Activation Permission (red rectangles in Figure-3)
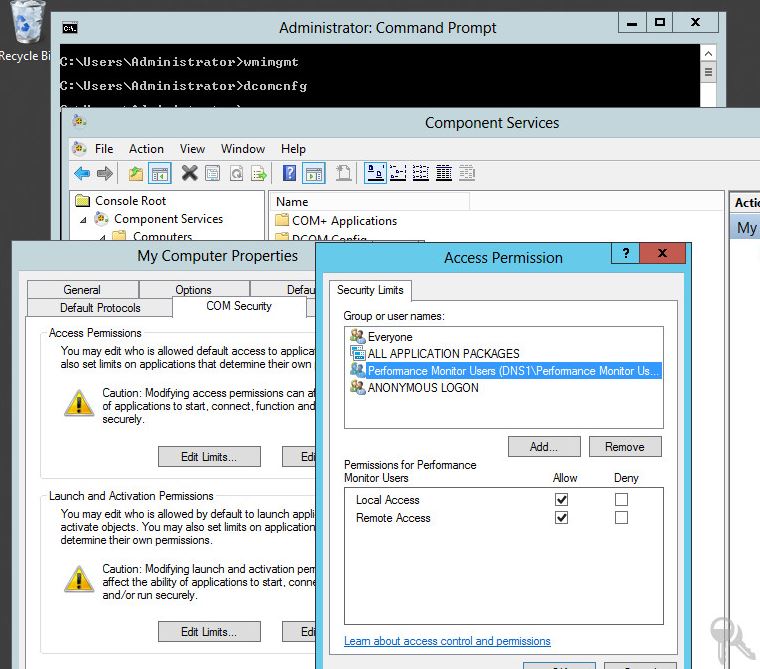
Add Performance Monitor Users group and give Local Access and Remote Access permissions for both properties.(Fig-4)
OK, Save the settings.
Fig-3: DCOM Properties
Fig-4: Change security settings for performance monitor users
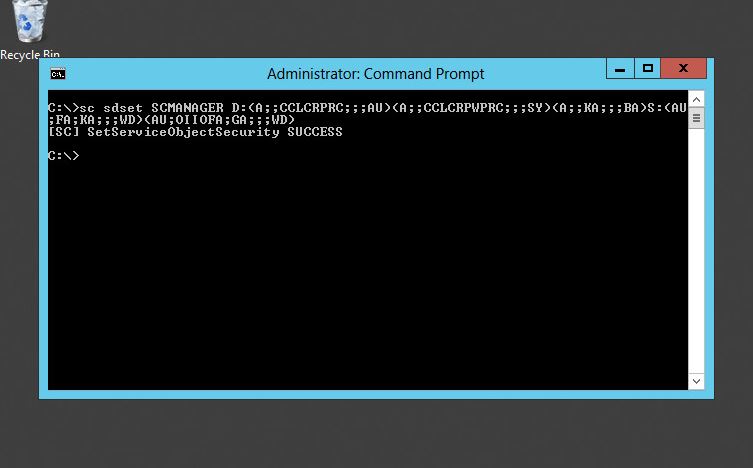
As of now, we can monitor the system processes and CPU, Memory, Network of computers. But, to monitor the state of service, we need to add one setting. This step comes since Server 2003SP2 as Microsoft fixed it as a security issue. You can check at the Microsoft KB article here. So, type the below command in the elevated command prompt as an Administrator, as shown in Figure-5.
Fig-5: Change permissions through Service Control Manger
Step-4: Let’s start Monitoring, let’s see if it works ?
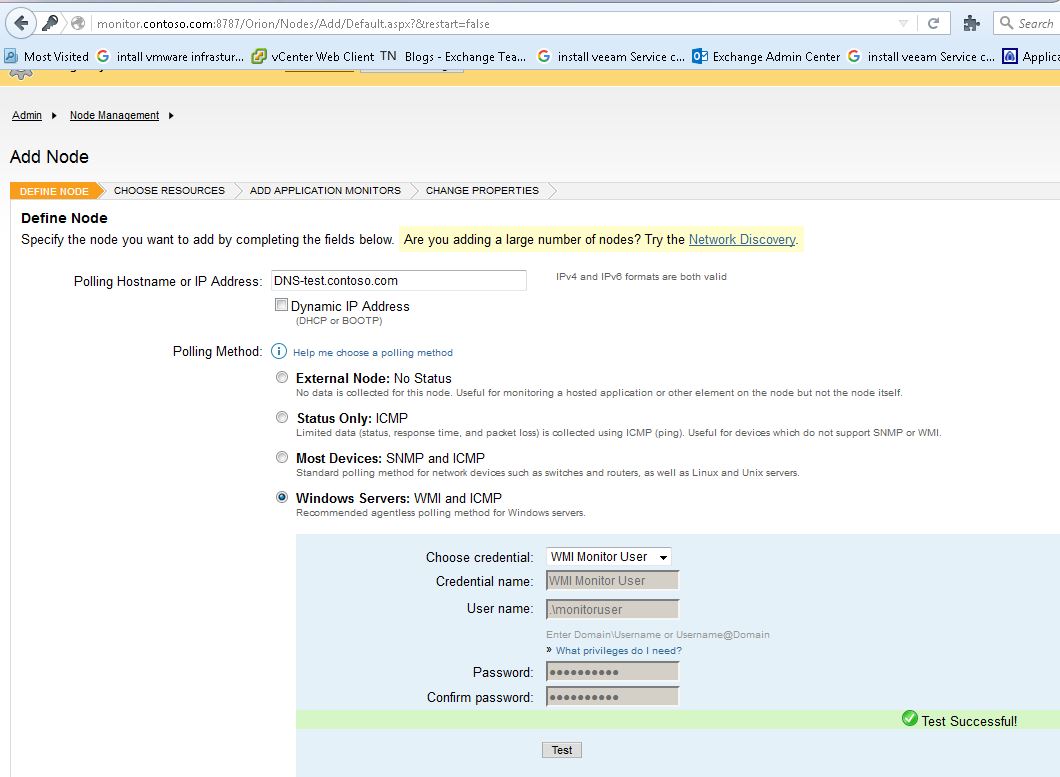
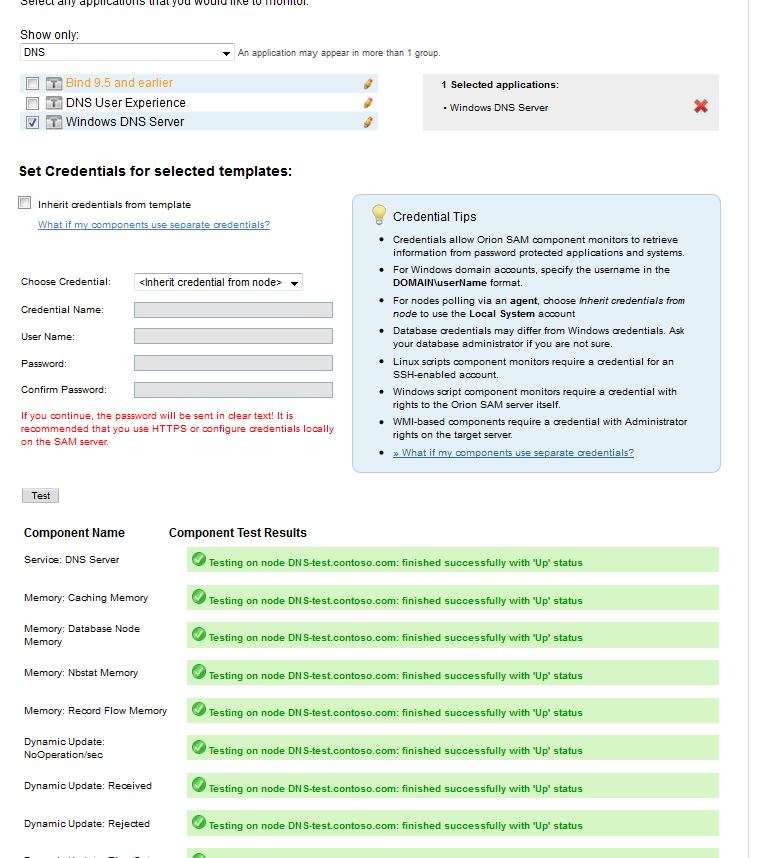
Now, Let’s add the server node to our monitoring software, I assumed that the solarwinds is already installed. The username is ‘admin’ and blank password.
So, you can add the node as shown in figure-6.
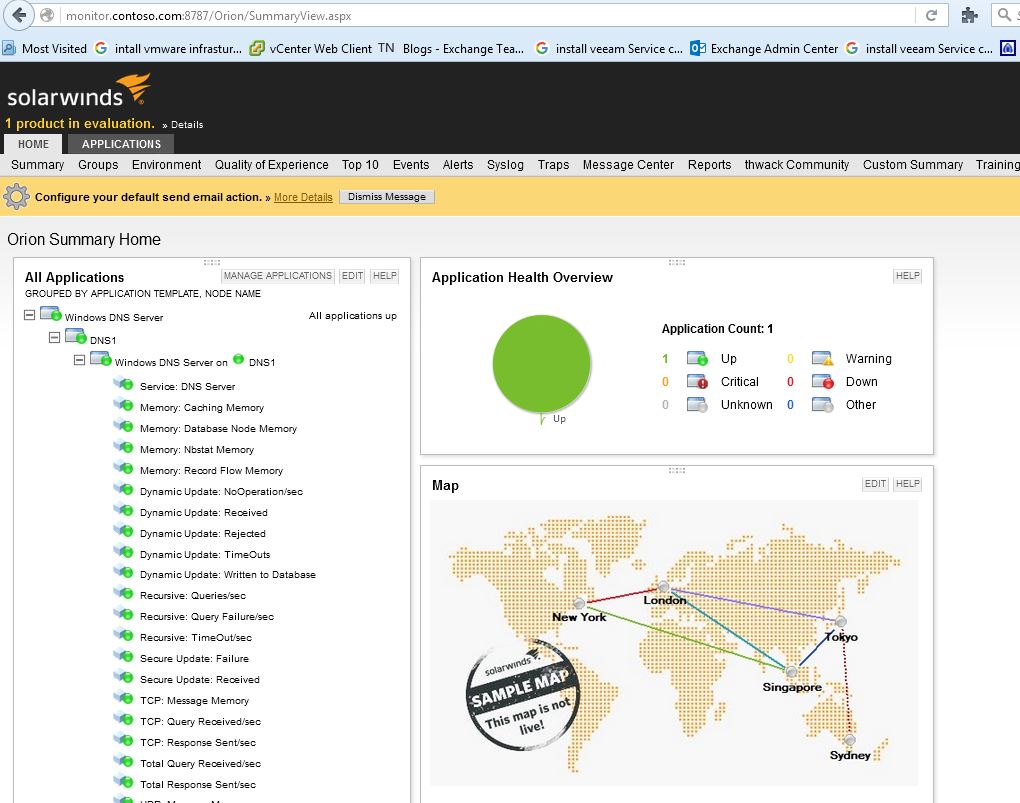
Figure-6: Add the Node to Solarwinds Console
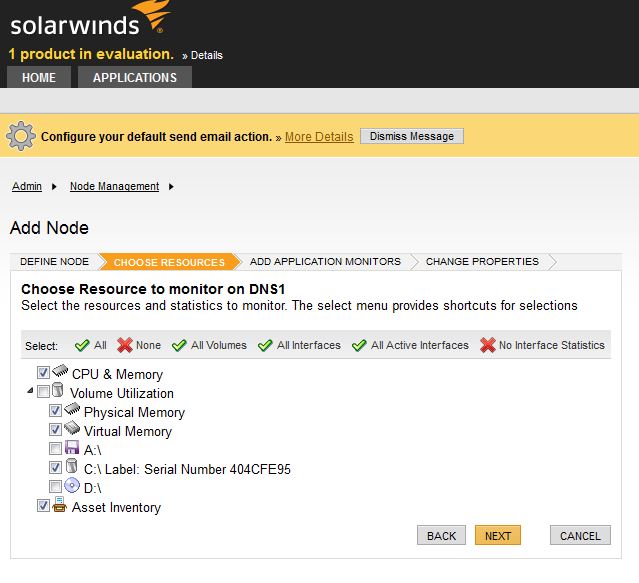
In next page you can choose for basic monitoring as shown in figure-7.
Fig-7: Choose resources to monitor
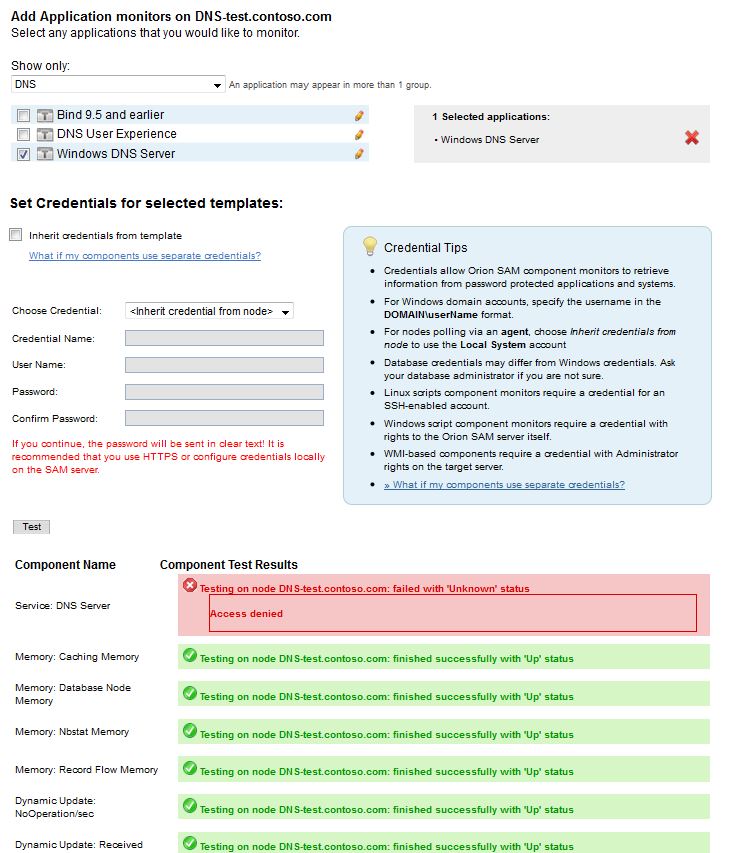
The next page is about the specified service or roles that you want to monitor. I choose the DNS serverand test it.
Oops, it has some alerts ! It is about DNS service cannot be monitored although DNS service is running…
It is because we have to monitor the DNS service and it seems it’s not available to our pre-configured user, monitoruser (which is in the special group to be able to monitor ;P ). See the figure-8.
For this we can check if our user has the necessary permission using the windows built-in tools in the next step.
Fig-8: DNS Service Status is access denied
Step-5: Always check if the monitoring user has necessary permission to do something
Microsoft has a tool to view or modify CIM classes or WMI classes, using WQL queries. From there, you can query the system services or DCOM objects. We are going to use it now.
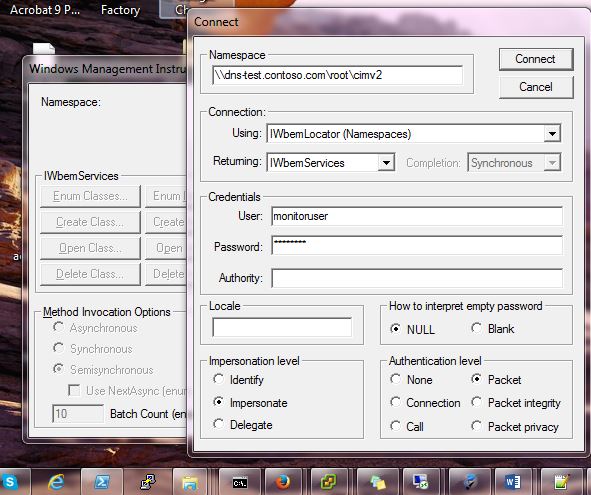
Run > wbemtest > Connect and put the parameters. In the namespace field, use \servernamerootcimv2. Use usernames and passwords for monitoring user and Connect. See my figure-9.
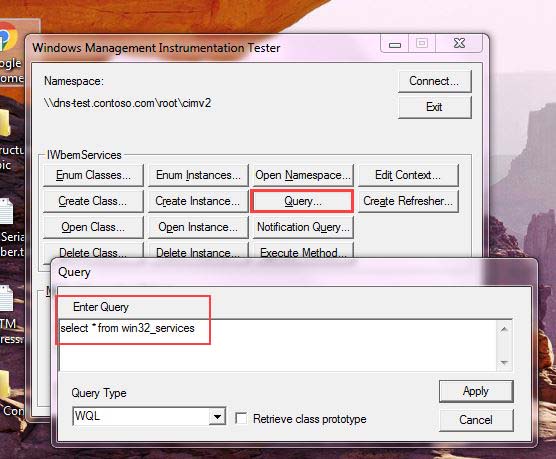
Type select * from win32_services in the query field. And it should return the list of available services to our monitoring user. See figure-10 and figure-11.
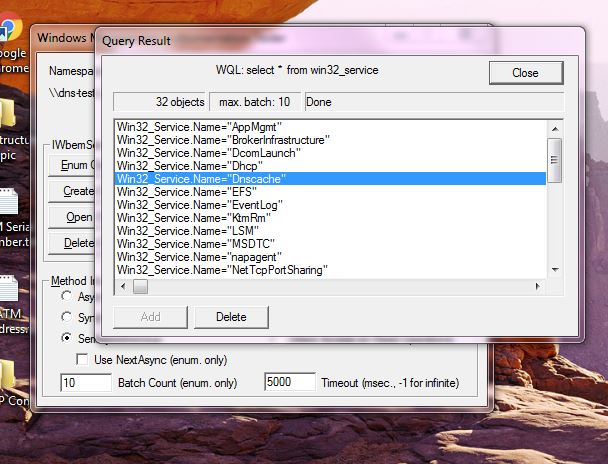
Check if the service we want to monitor is listed in the results. Here, we want to monitor DNS Server of which the service name is DNS. (you can check the service name as Run > services.msc and check the properties of that service).
We do not find the “DNS” but instead we find the Dnscache which is the DNS Client service.
So, we can conclude that DNS service is unavailable to service control manager even we have given permission just before Step-4. So, we have to specifically change the security settings for DNS service.
Fig-9: Query service with wbemtest – Define credentials & Namespace
Fig-10: WQL query to list all available windows services
Fig-11: The list of services by WQL query
Step-6: Modifying the Security Permission of Service
Please take this step carefully because every syntax in these commands are sensitive to changes and may affect the system adversely unless you have a saved copy of previous settings. You can refer to figure-12.
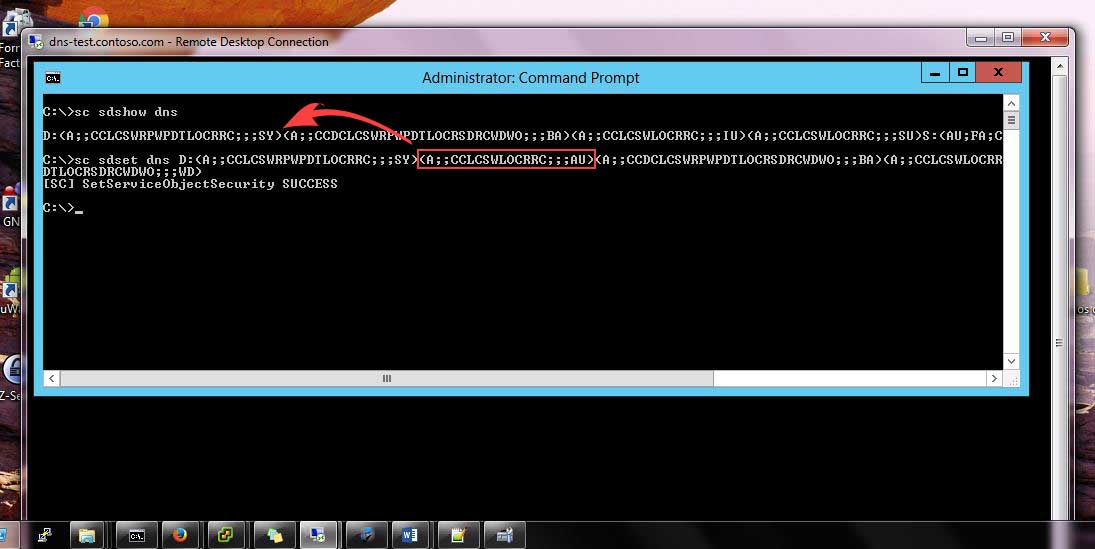
1)From the elevated command prompt, check the service settings of DNS service by the following command.
sc sdshow dns
2)Copy the output exactly as it is to notepad
3)Put the following parameter between the end of the first bracket and the start of the second bracket. (A;;CCLCSWLOCRRC;;;AU)
4)So, the new line would be (please note that it’s just a single line): D:(A;;CCLCSWRPWPDTLOCRRC;;;SY)(A;;CCLCSWLOCRRC;;;AU)(A;;CCDCLCSWRPWPDTLOCRSDRCWDWO;;;BA)(A;;CCLCSWLOCRRC;;;IU)(A;;CCLCSWLOCRRC;;;SU)S:(AU;FA;CCDCLCSWRPWPDTLOCRSDRCWDWO;;;WD)
5)Change the the DNS service security by adding some commands to the above parameters (note that it’s a single line).
Note: Let me explain a bit on this command. sc sdshow dns is to show the security descriptor of the service. And then, we put our monitor group (aliased as AUfor Performance Monitor Users) with the necessary permission in line 3.
The capital A in the first letter is for Allow. The capital D: in the 4th line is Discretionary ACL (DACL).
The capital S: in the first of the last bracket means System Access Control List(SACL). Each alias CC, LC, SW, LO, CR, RC has a special meaning for access permission. You can find more about the access lists from the below 2 links.
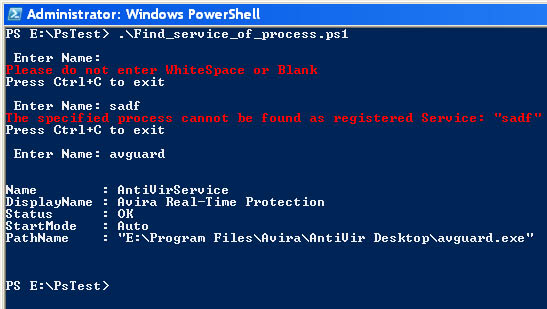
Today, I need to find the registered services of some running processes & its installed path. Here we can use some third-party tools, such as Process Explorer, Process Hacker and find each process’s associated service. But, I want to use the built-in options, so WMI with Powershell is the way to go. I also checked the windows task manager and it only listed the service & it’s associated service name, not the process name. So, I need to do some scripting to get it through. It’s the sample output.
In windows system administration, understanding how to stop windows services which is not responding or hanged is a crucial skill. Whether you’re troubleshooting a misbehaving process or aiming to optimize system resources, knowing the ins and outs of service management can significantly impact your computing experience.
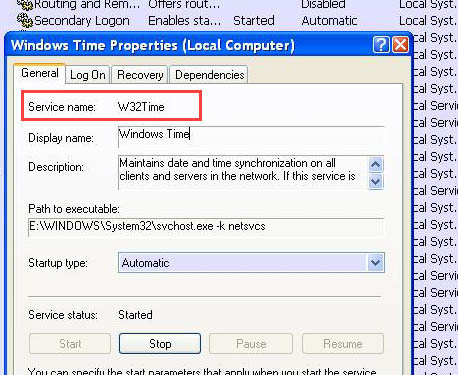
In this example, let’s forcefully stop the windows time service by killing the associated process.
First, query the service PID via NT service controller.
sc queryex <servicename> eg. sc queryex w32time Note: you can find the service name from services.msc in Run box. Here w32time for Windows Time Service.
2) Note the PID of the service. Here our process ID is 904
You might sometimes encounter grayed-out services, particularly in scenarios like antivirus programs where certain services are intentionally safeguarded against tampering for security purposes, can pose challenges in managing your system effectively. However, there are strategies you can employ to navigate this hurdle and regain control over these services.
Option 1 – Startup Config
1) type “msconfig” in Run box 2) in the service tab, uncheck the service 3) reboot the computer
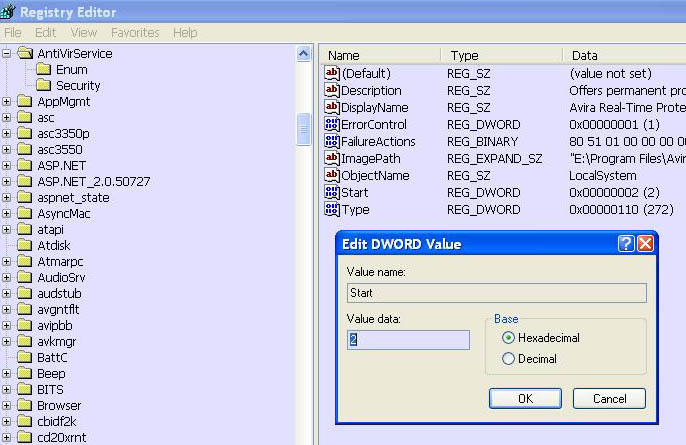
Option 2 – Registry Modification
The second method involves accessing the Windows Registry, the central repository of system settings, and making targeted modifications to alter the startup type of the grayed-out services. 1) Go to HKLMSYSTEMCurrentControlSetServices 2) Double-Click the Start SubKey 3) Change the DWORD value to 0 to 4 according to your startup option. 2 for Automatic & 4 for Disabled.
Below are Start values and description according to the technet article.
Value
Description
0
Boot (loaded by kernel loader). Components of the driver stack for the boot (startup) volume must be loaded by the kernel loader.
1
System (loaded by I/O subsystem). Specifies that the driver is loaded at kernel initialization.
2
Automatic (loaded by Service Control Manager). Specifies that the service is loaded or started automatically.
3
Manual. Specifies that the service does not start until the user starts it manually, such as by using Device Manager.
4
Disabled. Specifies that the service should not be started.