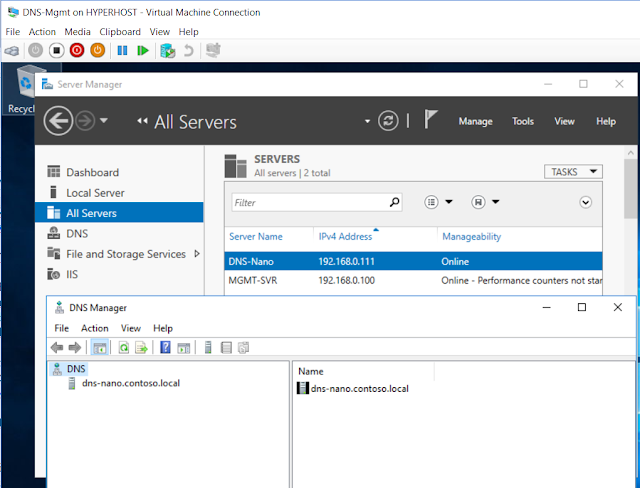
In this post, we will install DNS service on Nano Server and manage via the DNS Manager Console from other computer. If you want to create Nano Server Image GUI wizard, you can check out here. In our post we are going to create Nano Sever Image by the Nano Server Generator powershell script that comes with installation ISO.
There will be two Scenarios in our testing and you can just use either depending on your environment.Scenario 1: DNS Server in Domain Environment
The management server (on which RSAT DNS Tools is installed) is already in domain environment. The new Nano Server must join the domain. In this case, you will need to create the blob file (file with domain join info) before the Nano Server VHD is created by Powershell Script.
Scenario 2: DNS Server in Workgroup Environment
The management server is in workgroup(non-domain environment). The new Nano Server do not need to join to domain. So we do not need to create blob file but before you manage the DNS Nano Server from Management Computer, you need to add hostname/IP of Nano Server to the Management Server’s trusted hosts list.
Machine Info and Test Scenario.
|
VM Name
|
FQDN
|
IP Address
|
Remark
|
|
dc01
|
dc01.contoso.local
|
192.168.0.10
|
domain controller
|
|
DNS-Mgmt
|
Mgmt-Svr.contoso.local
|
192.168.0.100
|
Management Server on which RSAT DNS
Tools is installed
|
|
DNS-Nano
|
DNS-Nano.contoso.local
|
192.168.0.111
|
Nano Server on which DNS service will be
running
|
The first 2 servers are Windows Server 2016 Hyper-V VMs running on physical machine named HyperHost. On this physical machine, we will create Nano Server VHD which will be running on Hyper-V. We assume Windows Server 2016 ISO is mounted on ‘HyperHost’ (Instead of using a different machine for Nano Server Image creation, you can also use the same management server. But make sure ISO is mounted on that machine).
Test Case 1: DNS Server in Domain Environment
Step 1: Create blob file on another domain joined computer
Since we create the image on workgroup computer, we need to create the blob file. The format is:
djoin /Provision /Domain <yourdomainname> /Machine <hostnameofnewMachine> /SaveFile <pathOfBlobFile>
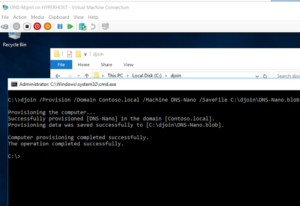
Run it on the Mgmt-Svr server and save under C:djoin folder. See Fig-1.
djoin /Provision /Domain contoso.local /Machine DNS-Nano /SaveFile C:\djoinDNS-Nano.blob
Step 2: Create Nano Server Image with IP settings with blob file info
We now copy the blob file which is in C:djoin folder from Mgmt-Svr to E: of ‘HyperHost’ where our Nano Server ISO is mounted.
Open powershell in elevated mode. Create the directory under E: to temporarily copy Nano Server files from mounted ISO.
New-Item E:\Base -Type Directory
Import powershell module from Disc.
import-module D:\NanoServerNanoServerImageGeneratorNanoServerImageGenerator.psm1
Then create the image. See Fig-2. It’ll be like in Fig-3 when the image creation is completed.
New-NanoServerImage -MediaPath D: -BasePath E:\Base -DeploymentType Guest -Edition Standard -Ipv4Address 192.168.0.111 -Ipv4SubnetMask 255.255.255.0 -Ipv4Gateway 192.168.0.1 -Ipv4Dns 192.168.0.10 -InterfaceNameOrIndex Ethernet -TargetPath E:\DNS-NanoDNS-Nano.vhd -DomainBlobPath E:\DNS-Nano.blob
(If you create the image from Mgmt-Svr that is already joined to domain, please use the following command instead)
New-NanoServerImage -MediaPath D: -BasePath E:\Base -DeploymentType Guest -Edition Standard -Ipv4Address 192.168.0.111 -Ipv4SubnetMask 255.255.255.0 -Ipv4Gateway 192.168.0.1 -Ipv4Dns 192.168.0.10 -InterfaceNameOrIndex Ethernet -ComputerName DNS-Nano -DomainName contoso.local -TargetPath E:\DNS-NanoDNS-Nano.vhd
Some parameters explanations are below while others are self-explanatory.
MediaPath – Path where you mount Nano Server Installation files(normally Server 2016 DVD).
Basepath – Base path where the Nano server files are copied during image creation. You may need to delete these files since these files are not deleted after creation.
Deployment – ‘Guest’ if you want it to run as Hyper-V image or ‘Host’ if you want to apply it on physical system.
Edition – Edition of Nano Server image you want to create: Standard or Datacenter.
InterfaceNameOrIndex – Name or Index of the network adapter where IPv4 settings should be applied (default is Ethernet)
TargetPath – Location where you want to save the newly created VHD file.
DomainblobPath – Location of the blob file which is required to join the NanoServer to domain.

Step 3: Add DNS Package to VHD, Install DNS Role
We can add the DNS package with -Packages parameter at the time of our image creation. But here, we will add DNS package after the image is created. See Fig-4.
Edit-NanoServerImage -BasePath E:\Base -TargetPath E:\DNS-NanoDNS-Nano.vhd -Package Microsoft-NanoServer-DNS-Package

If you want to check what role & features are available in our Nano Server virtual disk.
Get-WindowsFeature -Vhd E:\DNS-NanoDNS-Nano.vhd
Now, we enable the DNS Server Role. See Fig-5.
Install-WindowsFeature -Vhd E:\DNS-NanoDNS-Nano.vhd -Name DNS

Step 4: Create New Nano Server Virtual Machine
Here I will create New VM with our existing VHD in Hyper-V, which is quicker than doing in powershell.
1) Right Click Hyper-V host >> New >> Virtual Machine. See Fig-6.

2) Give the VM Name and choose the folder to store VM. My VM name is DNS-Nano.
3) On the next page, choose generation of VM. Generation 2 supports UEFI boot. For me I choose generation 1, which doesn’t require *.vhdx format.
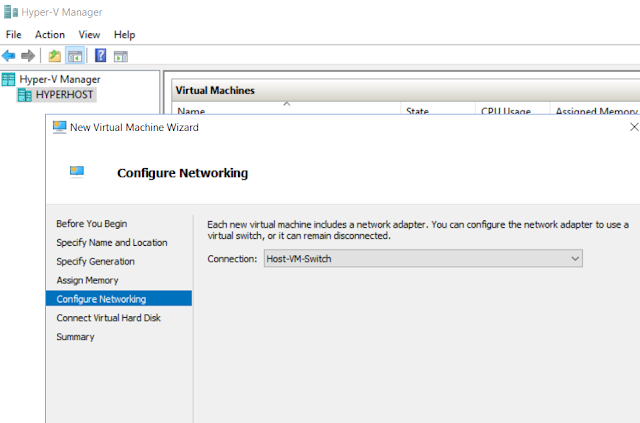
4) On the next 2 pages, assign memory and choose networking. I choose the internal network so that my VMs can communicate to each other. See Fig-7.
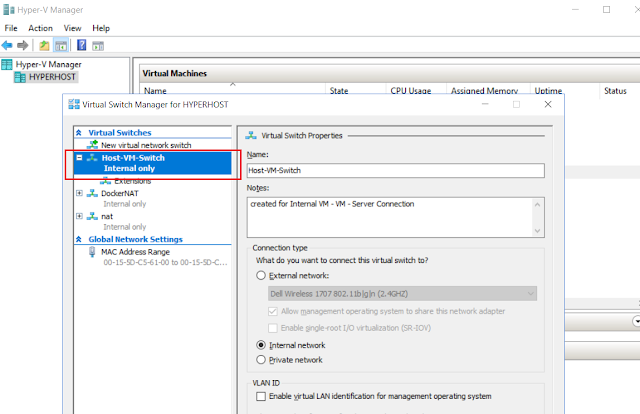
(you can create the internal network from Right-Clicking the Hyper-V host >> Virtual Switch Manager. See Fig-8. In my case, I connect all VMs to ‘Host-VM-Switch’ virtual switch)
5) Select existing virtual which you have created with New-NanoServerImage cmdlet. See Fig-9. Click finished.
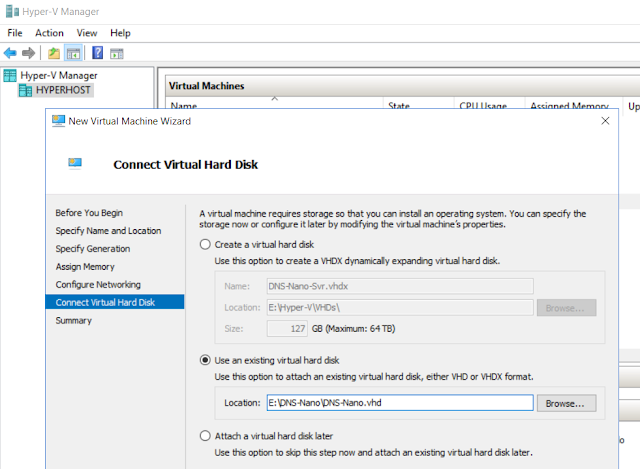
6) Start VM.
Step 5: Install RSAT DNS Tools on Management Server and connect to DNS service
As of now, DNS role is installed and you can now login to Nano server with the domain account. We will use DNS Manager Console of another domain-joined computer to manage DNS server on Nano machine. Type the following command in powershell to install DNS RSAT Tools. See Fig-10. You can also use the server manager on management machine to install DNS server console.
Install-WindowsFeature -Name RSAT-DNS-Server
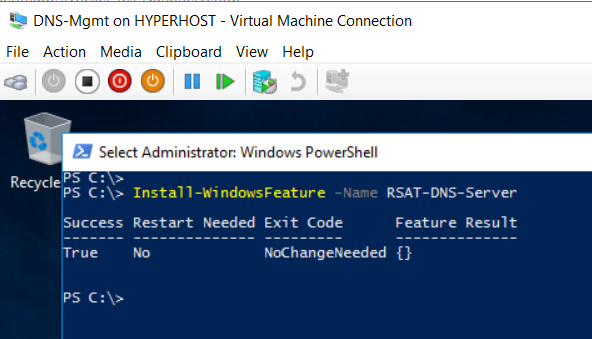
Then we need to add DNS-Nano to the server manager of Mgmt-Svr server. Follow the below on management computer.
1) Open the server manager.
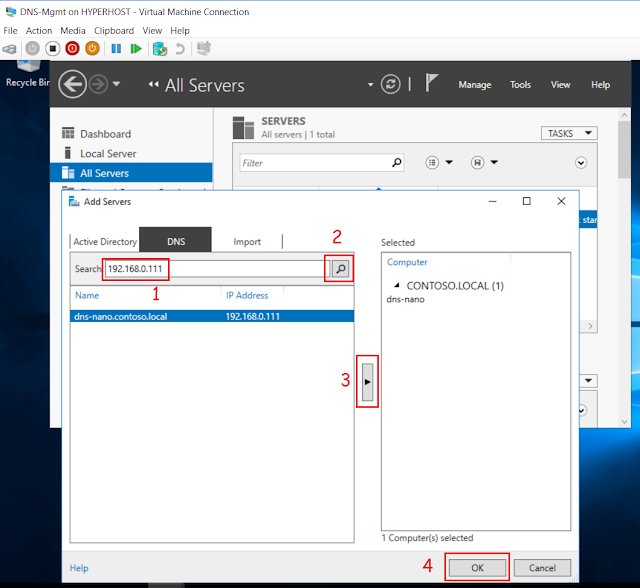
2) From ‘All Servers’ tab, right-click and ‘Add Servers’. See Fig-11.
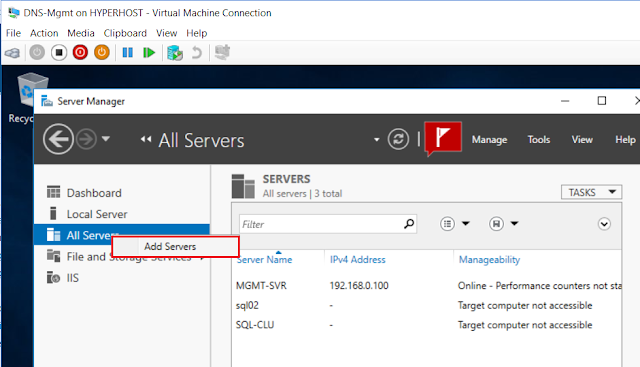
3) From the DNS server tab, search DNS-Nano and add to the right pane. And click OK.
4) Go to the DNS tab of Server Manager. You will see the recently added server. Right-click and choose ‘DNS Manager’. See Fig-12.
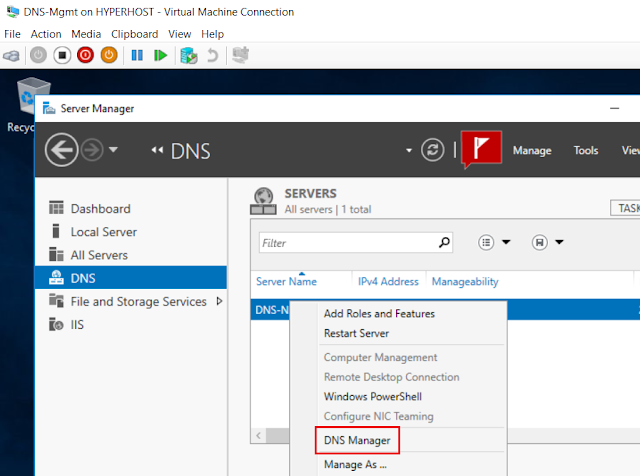
5) The DNS service running on Nano server is now connected. You can configure your first DNS zone and other settings. See Fig-13.
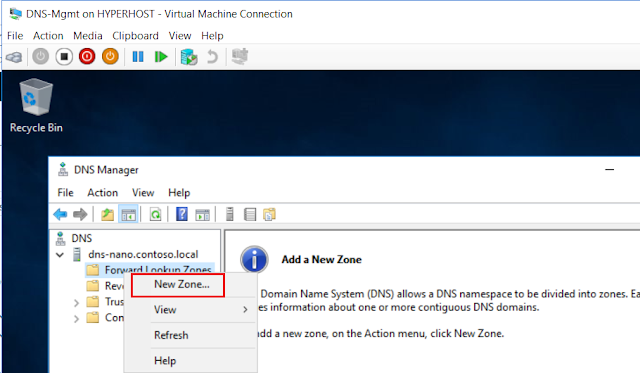
Test Case 2: DNS Server in Workgroup Environment
If you want to place the newly created Nano Server in workgroup environment, this scenario should help. In this case, the image creation and VM registration process is the same as the Test Case 1. But since we don’t need to create blob file, we can start from step-2 of Test Case 1. Do the following steps in computer where the Server 2016 ISO is mounted.
Create the base directory and import the required module.
New-Item E:\Base -Type Directory
Import-module D:\NanoServerNanoServerImageGeneratorNanoServerImageGenerator.psm1
Since, we don’t need to join Nano server to domain, remove -DomainName parameter from the previous command.
New-NanoServerImage -MediaPath D: -BasePath E:\Base -DeploymentType Guest -Edition Standard -Ipv4Address 192.168.0.111 -Ipv4SubnetMask 255.255.255.0 -Ipv4Gateway 192.168.0.1 -Ipv4Dns 192.168.0.10 -InterfaceNameOrIndex Ethernet -ComputerName DNS-Nano -TargetPath E:\DNS-NanoDNS-Nano.vhd
(parameters in the above command are explained in Test Case 1)
Add DNS Role to our Nano Server VHD.
Edit-NanoServerImage -BasePath E:\Base -TargetPath E:\DNS-NanoDNS-Nano.vhd -Package Microsoft-NanoServer-DNS-Package
Enable the DNS Server Role.
Install-WindowsFeature -Vhd E:\DNS-NanoDNS-Nano.vhd -Name DNS
Creating new VM from existing VHD is the same as in Test Case 1. So, use the Step 4 of Test Case 1.
Then, one thing to do is: Before we can add the Nano server to the Server Manager Console, we need to add Nano server hostname or IP into trusted host list of the management server (here, my management server is DNS-Mgmt).
Set-Item WSMan:localhostClientTrustedHosts “<IP Address/Hostname of Nano Server>”
Since, our Nano Server is resolvable by DNS, I need to add both IP and FQDN of my Nano server to our trusted host list as shown in Fig-14.
Set-Item WSMan:localhostClientTrustedHosts “192.168.0.111,dns-nano.contoso.local”
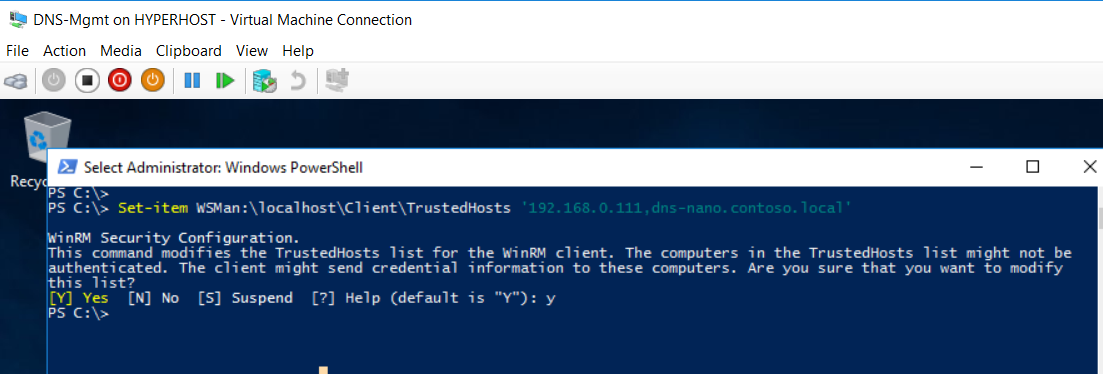
Now add the ‘DNS-Nano’ to Server Manager of Management Server. See Fig-15.
In the workgroup environment, we don’t have the kerberos authentication. So we need to enter different credential to manage the Nano Server. Right-Click the Nano server and select ‘Manage As…’. You need to enter username in the format of: <username>@mydomainname. See Fig-16.
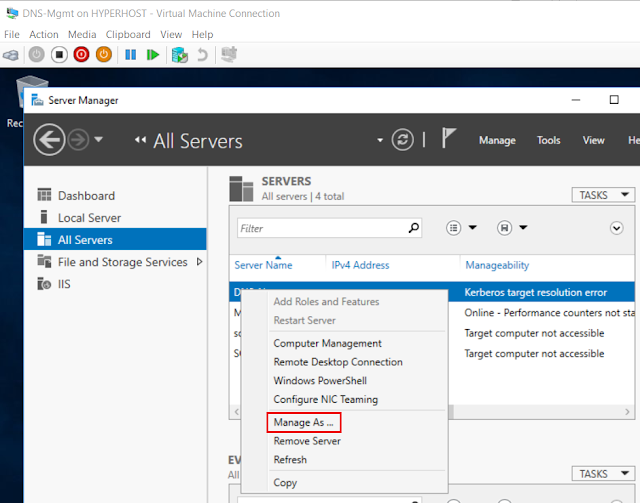
Then, install RSAT DNS Tools on Management Server.
Install-WindowsFeature -Name RSAT-DNS-Server
Now you can manage the DNS console of newly added Nano Server by right-clicking and select DNS Manager. See Fig-17.
