Powershell Debugging Made Easy: A good start tutorial


There are times when you spot an error yet can’t find where it is located or the lines when it occurred, only then you’ve to go for line-by-line debugging. Powershell has built-in debugging tools for this. Generally, there are 2 methods for debugging. and you can use anything based on your preference.


  1. Write-Debug, where you need to manually suspend/continue the running script to inspect.
  2. Set-BreakPoint, which automatically enters into the pre-defined breakpoints, based on Variables or Line number, you defined in the current powershell session.
 
Since I want to show you how to deals with simple debugging methods, let’s start with the simple script. Here, we will add two values 2 and 5. Needlessly to say, the output is 7.  But, it gives out 25 in the result which is unexpected. This is where we should give a try on powershell debugging mode.
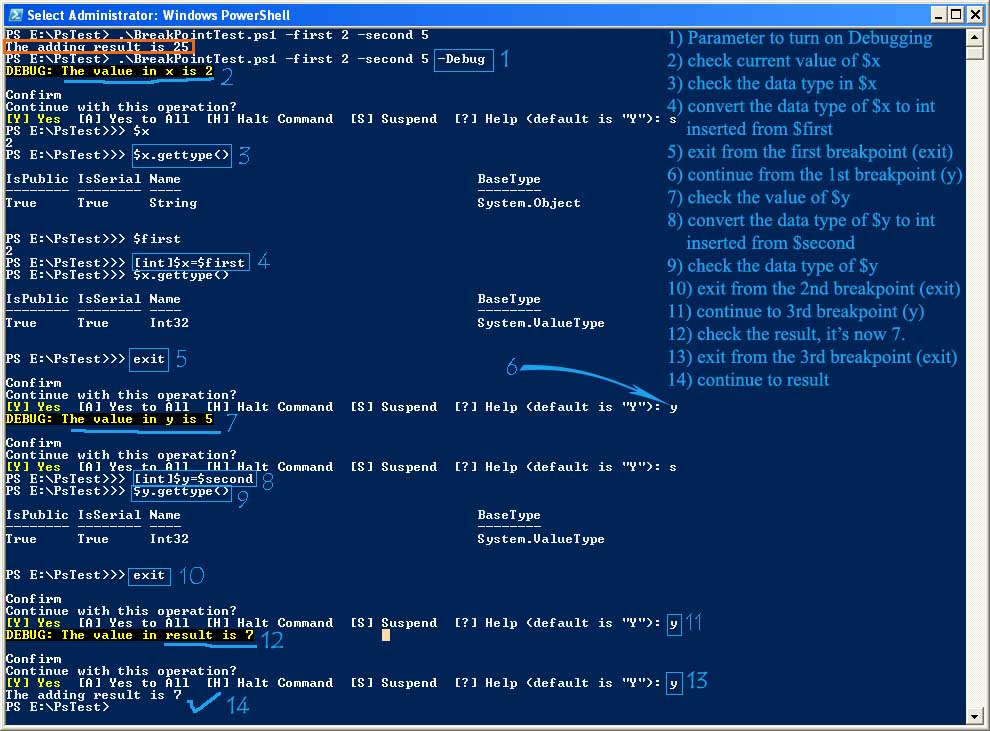
 

First Method

  1. You need to define the breakpoints with Write-Debug cmdlet for every line you want to inspect
  2. When you run the script, you need to use -Debug parameter
  3. For every breakpoints, you’ll be asked to:
  • Continue: to continue the script skipping that particular breakpoint
  • Suspend: stops at the breakpoint and inspect the runtime environment
  • Halt: Stop and exit from the script.
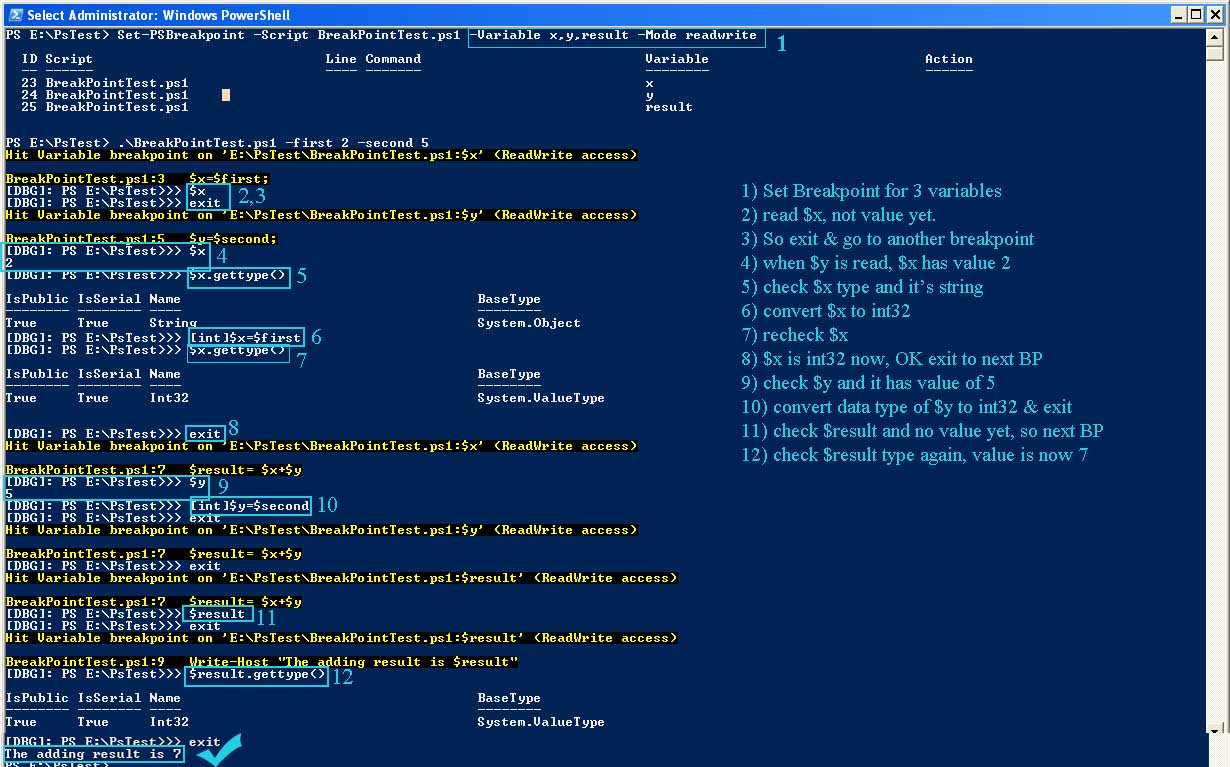
Second Method

  1. You need to pre-defined which variable or line number to setup breakpoint and powershell will stops at every these breakpoints, with the current line number & variable.
  2. Those breakpoints go away when you exit from the current powershell session, so it’s session specific. And you can’t save these breakpoints. You turn on breakpoints for every line you want by pressing F9 in powershell ISE.
  3. The command for example isSet-PSBreakpoint -Script myscript.ps1 –Variable x,y,result –Mode ReadWrite
** -Mode Parameter accepts 3 inputs: Read, Write and ReadWrite. Read is used when you want to stops the script when these variables are read. Write for when these variables are being written. And, ReadWrite for both. I explained the debugging steps in the figure for easy viewing. See the script at the end.
 
Powershell Debugging
Fig-1:Method 1
 
Powershell Debugging
Fig-2: Method 2

After you’ve checked the variables, the error is you’ve defined the variables $first and $second as string types. So, just remove it.

Powershell: Automatically Check and Correct multiple NTP Clients

Here is the script that will help system admins to automatically check the windows NTP settings on multiple computers through registry. For this to work, you need to enable Remote Powershell on client computers. If remote powershell is not enabled on each of the servers to be checked, you can find my post here to enable it.

What this script will do:
This scipt will,

1) check the necessary ports (5985 or 5986), if winRM is enabled for Remote Powershell.
2) Check the current NTP values.in registry with the pre-defined values in script. If not matched, you can correct instantly.
3) Select the standard TimeZone of servers by the occurrence of mostly used values.
4) If the appropriate time zone not found, your machine time zone will be used as standard time zone. And compare each server with the standard timezone. If not matched, you can prompted to correct.
5) It select the standard time by the occurrence of current time values on each server.(compare up to minutes’ detail)
6) If the appropriate current time is not found, your machine time will be used as standard time. And compare each server with the standard time. If not matched, you are prompted to correct.
7) It will detect the stopped time service and prompted you to start the service.

Glad if you find it useful, Cheers !

Change Windows NTP with Powershell
Fig-1: The demo Run

You can download my script from github.

Powershell: Check the Internet Accessibility for Multiple Computers

Sometimes, you need to make sure all your servers have internet access or not, especially after network change or for monthly auditing purpose. With powershell, you can achieve this by using .Net call to sockets. And, I found the script on this site to work as a baseline and use Mr. stevethethread’s code to colorize the output.  You will need to save the list of servers in Server.txt in the same directory as script, and change the port number in the script as needed. Continue reading “Powershell: Check the Internet Accessibility for Multiple Computers”

PowerShell: Join Domain Users to Any Specific OU

I have been looking for ways for automatic domain join so that the end-users can do by themselves without special  knowledge. There are serveral scripts I found on google that make it work, but none of them seems to be an all-in-one solution.Moreover, I don’t want to do usernames/password put in text files that are delivered to each user. So, I decided to make a complete script for automatic-domain-join  of users.

What this script will do:
1) Test the DNS Server is reacheable and if OK, change the users’ DNS setting to point to Domain Controller.
2) Prompt for username/password to join to domain, no need to put username/pass with the script file.
3) Users can choose their own OU for their domain-join-process, so Admin doesn’t need to move thier computer objects to specific OU after domain join. ( the one I liked most & the reason why I wrote this script xP ).

Things you need to do:
1) Modify the Admin section of the script to your needs

2) Delegate All OUs to create computer objects for domain users so that they themselves can join to the domain. (This is the one that took my most time troubleshooting the access denied error.)
I would recommend to create the new security group, delegate the permission to that group and put the domain users into the group. Because it’s more safer to delete (rather than revoke delegation permission) that security group after all users are joined to domain.

3) Some Clients may need to enable powershell script execution policy to remotesigned, so that powershell scripts can execute. You can do it by another batch script that call the powershell script ,,, etc… etc..

1) Delegating OU Permission
Only the the Admin and Account Operator roles have permissions to create computer & users objects in any OU. We need some little right for users to perform themselves. But granting Account Operator roles to every domain users is a the one we should never do. So, I will give only necessary permissions.

Step1:
From Active Directory Users and Computers, Choose the parent OU you want to delegate.

Fig-1:Permission Delegation for specific OU

Step2:
Delegate the security group to create computer objects in Active Directory.

OU Delegation
Fig-2: Add OU delegation to specific security group

Step3:
On the next page, choose Create a custom task to delegate.

Step4:
Choose Computer Objects and check the “Create selected objects in this folder” as shown in Fig-3.

Fig-3: Choose resources for OU delegation

Step 5:
Customize the permission Here I select the Write and Create all child objects. Others default.

Add custom permission for OUO delegation
Fig-4: Add custom permission for delegation

So far, we finished about delegating permission. Now, the client can run the script on his computer. See Fig-5.

Domain Join Powershell Script
Fig-5: Demo of running the script

Powershell: Find the Windows Service of a Running Process

Today, I need to find the registered services of some running processes & its installed path. Here we can use some third-party tools, such as Process Explorer, Process Hacker and find each process’s associated service. But, I want to use the built-in options, so WMI with Powershell is the way to go. I also checked the windows task manager and it only listed the service & it’s associated service name, not the process name. So, I need to do some scripting to get it through.
It’s the sample output.

Find a running process's service by Powershell and WMI
Fig-1: Find a running process’s service
 

How to Enable PowerShell Remoting in Easy Way

Empower yourself with the ability to perform administrative tasks on multiple servers remotely, even while users are logged in or away. PowerShell remoting, available since PowerShell version 2 and above, opens up a world of possibilities for system administrators.

If you’re using Windows 7, 2008R2, or newer, PowerShell remoting is already at your fingertips. However, for legacy environments like Server 2003 and Windows XP, a few additional steps are required. You’ll need to install the Server 2003 Service Pack 2 and the Windows Management Framework.

Things to do on the destination computer

This is the computer on which you want to execute the remote commands. On this machine, run PowerShell as an administrator and execute the command.

Set-ExecutionPolicy RemoteSigned

Then, initialize WinRM with the following command:

winrm quickconfig -quiet

On the source computer, you’ll also need to start the WinRM service temporarily to configure settings. Remember to add the destination computers to the trusted hosts list for communication. This ensures a secure connection between local and remote systems. Other words, in trustedhosts list, you can define the destination computers by IP addresses separated by commas or using wildcard as follows.
(Note: if you use the HTTPs, you need to generate the certificate and add to each computer, so it would be more efficient to enroll the certificate via GPO in domain environment. I’ll write the other article for this scenario)

Things to do on Source Computer

This is the computer that will initiate the connection. In the elevated PowerShell session of source computer, type:

winrm quickconfig -quiet
Set-Item WSMan:\localhost\Client\TrustedHosts -Value "192.168.1.*"

 
Figure 1:  WinRM Quick Configuration


Figure 2: Added Computers to Trusted Hosts

Let’s test the Connection

You can use Test-WSman to test if the powershell remoting works. The following command will test the connection.

Test-WSman -ComputerName 192.168.1.222 -Credential (Get-Credential) -Authentication default


Figure 3: Testing the Connection

Using remote script execution (example)

You can execute remote scripts on multiple computers, you can put the computers names as IPs or hostnames in text file. Here is the one I show as example.

How to check multiple Forward and Reverse DNS records in Powershell

Tired of spending hours manually querying DNS records? A few days ago, I had to query over 100 DNS records to determine if both forward and reverse records were working properly. Making the nslookup over 100 records is a time-consuming and daunting task for a system administrator. Therefore, I decided to write a powershell script to automate the job.

You will need to put the hostnames in hostnames.txt file in the same directory as the script file and run the script.

.\Find_DNS_Forward_Reverse.ps1