Unlike a normal FTP server, the magic of FTP with user isolation is that every user
is jailed in this own directory and the user cannot see or write to other users’ directories, as well as changing to the parent root directory. In linux, it is similar to “chroot” option after the user has logged into his home directory.
Today, I will show you how to make ftp with user isolation in IIS 8.5 (also tested on server 2008R2 with IIS 7.5) with Domain user accounts in graphical Mode. Also, I have made a good powershell script to automate this ftp setup process for thousand of users ;P. Continue reading “The Magic of FTP with user isolation and how to automate the setup with Powershell (with Domain Users)”
Year: 2016
IIS Worker Process (w3wp.exe) memory usage too high in Exchange Server
w3wp.exe process is an IIS web application process to handle the client request for the application pool. Exchange server services heavily utilized w3wp process not only to handle users request from external but themselves make web service requests among Exchange server members using virtual directories (Owa, OAB & Powershell etc) and respective App pools. Unless you have not configured periodic recycling for Application Pool, you may need to do manual recycle to avoid memory leaks. Microsoft Technet states that: Continue reading “IIS Worker Process (w3wp.exe) memory usage too high in Exchange Server”
Powershell: Find AD Users’ Logon History with their Logged on Computers
One of the daily system admin task is to check the user login history throughout the domain. It becomes quite a tough task if you have to go through thousands of event logs to find the correct security events of users logon from every domain controllers. Though we filter only the Kerberos Authentication Events for TGT (Ticket-Granting-Ticket) Requests, there are so many information in each event regarding to specific users.
So, I am taking some time to put all these Kerberos events together from every domain controller to look for some useful information and then write this handy script to save my difficult days ! Continue reading “Powershell: Find AD Users’ Logon History with their Logged on Computers”
How to Digitally Sign the Powershell Scripts with Microsoft CA in Domain – A step-by-step Guide – Part 4
Go to >> Part-1:Install ADCS service and configure Code Signing Certificate Template
Go to >> Part-2: Request the certificate to sign the script by user1
Go to >> Part-3: Configure GPO to allow only signed scripts and add user1’s certificate to trusted publisher group on domain computers
Now, it’s time to test running the script. Let’s say user2 has recently joined to your company and try to run some script downloaded from internet on Node-2 computer which is a newly domain joined computer. Also, don’t forget to “gpupdate” on client computers after your GPO is changed. Continue reading “How to Digitally Sign the Powershell Scripts with Microsoft CA in Domain – A step-by-step Guide – Part 4”
How to Digitally Sign the Powershell Scripts with Microsoft CA in Domain – A step-by-step Guide – Part 3
3) Configure GPO to allow only signed scripts and add user1’s certificate to trusted publisher group on domain computers
Go to >> Part-1:Install ADCS service and configure Code Signing Certificate Template
Go to >> Part-2: Request the certificate to sign the script by user1
Go to >> Part-4: Run the test scripts
In Part-2, we have signed the script with user1’s certificate. There are some manual works such as adding user1 certificate to trusted publisher group. Let us see how can we automate this process by using GPO.
First of all, we need to export user1 certificate from Node1 computer’s personal store to DC1 computer where we can distribute this certificate via Group Policy. Continue reading “How to Digitally Sign the Powershell Scripts with Microsoft CA in Domain – A step-by-step Guide – Part 3”
How to Digitally Sign the Powershell Scripts with Microsoft CA in Domain – A step-by-step Guide – Part 2
2) Request the certificate the sign the script by user1
Go to >> Part-1:Install ADCS service and configure Code Signing Certificate Template
Go to >> Part-3: Configure GPO to allow only signed scripts and add user1’s certificate to trusted publisher group on domain computers
Go to >> Part-4: Run the test scripts
In the Part-1, we have configured AD CS role and configure certificate template. Now, it’s time that user1 request his certificate and sign his script. On the Node-1 computer with user1 logged on as domain user: Continue reading “How to Digitally Sign the Powershell Scripts with Microsoft CA in Domain – A step-by-step Guide – Part 2”
How to Digitally Sign the Powershell Scripts with Microsoft CA in Domain – A step-by-step Guide – Part 1
Go to >> Part-2: Request the certificate the sign the script by user1
Go to >> Part-3: Configure GPO to allow only signed scripts and add user1’s certificate to trusted publisher group on domain computers
Go to >> Part-4: Run the test scripts
This is a lengthy post of how to digitally sign your powershell script, so I divide it up to 4 sections. Digitally signing of powershell script, for the security purpose, is particularly useful to prevent the execution of malicious scripts on servers or workstations in your domain environment. Today, I will show you how to sign your powershell scripts from Microsoft CA and use GPO to control the execution of unsigned scripts in domain environment. Continue reading “How to Digitally Sign the Powershell Scripts with Microsoft CA in Domain – A step-by-step Guide – Part 1”
Recover Crashed Exchange 2013 Mailbox Server in DAG
Recovering a crashed mailbox server is a straight-forward process if they are in DAG. You can do it by setup.exe /m:RecoverServer. However, there are certain steps to do for smooth recovery process. The following steps will do to recover the crashed mailbox servers in DAG. I will explain the each steps in more details.
-
Reset the crashed computer accounts in AD.
-
Install new server OS to replace the old crashed servers. Install windows features, pre-requisites and updates.
-
Remove the database passive copies on crashed servers. If the servers are accessible you can manually delete DB file and logs file residues from crashed servers.
-
Remove the crash servers from DAG. This can be done by EMC or EMS.
-
Evict(remove) the crash servers from failover cluster manager.
-
Start the recovery process by running setup file in command prompt with necessary switches. More details later in this section.
Here are detail steps I did for recovery:
1. Reset the crashed computer accounts in AD.
You can do it in ADUC console. Right-click the crashed computer account and “Reset Account”.
2. Install new server OS to replace the old crashed servers.
Install new servers with the same spec as old ones. You also need to install some windows features ,Microsoft filter packs and Unified Communication Runtime.
a) On new machine, open powershell with “Run as Administrator.
b) Install the necessary windows features in Powershell:
Install-WindowsFeature AS-HTTP-Activation, Desktop-Experience, NET-Framework-45-Features, RPC-over-HTTP-proxy, RSAT-Clustering, RSAT-Clustering-CmdInterface, Web-Mgmt-Console, WAS-Process-Model, Web-Asp-Net45, Web-Basic-Auth, Web-Client-Auth, Web-Digest-Auth, Web-Dir-Browsing, Web-Dyn-Compression, Web-Http-Errors, Web-Http-Logging, Web-Http-Redirect, Web-Http-Tracing, Web-ISAPI-Ext, Web-ISAPI-Filter, Web-Lgcy-Mgmt-Console, Web-Metabase, Web-Mgmt-Console, Web-Mgmt-Service, Web-Net-Ext45, Web-Request-Monitor, Web-Server, Web-Stat-Compression, Web-Static-Content, Web-Windows-Auth, Web-WMI, Windows-Identity-Foundation c) Download and install other prerequisities from here:
Note: Use the same computer name as old ones and join to domain.
3. Remove the database passive copies on crashed servers.
You can do it on EMS on good servers(since bad servers are not accessible). Open EMS and type:
[Ps]C:> Get-MailboxDatabaseCopyStatus *<name of your crashed server>

Make sure all the listed selected databases on your console output are all in Service Down state. Now, you can remove the failed databases by the following command. This should give you some warnings and don’t worry, just proceed it.
[Ps]C:> Get-MailboxDatabaseCopyStatus *<name of your crashed server> | Remove-MailboxDatabaseCopy
4. Remove the crash servers from DAG.
You can remove crashed servers from DAG by EMC console.
Go to EMC >> servers >> database availability group. Select the DAG Group and click the “Manage DAG Membership” icon. Remove the crashed servers from there.
<or>
You can remove crashed servers in EMS shell.
Remove-DatabaseAvailabilityGroupServer -Identity <your DAG Name> -MailboxServer <Your failed server name>
5. Evict the crash servers from failover cluster manager
Removing the failed servers from DAG does not remove them from failover cluster itself. So, we have to manually remove it. Before this, you can check which nodes in cluster are currently down state by the elevated command prompt.
C:cluster.exe node
To evict the node from cluster:
Go to Failover Cluster Manager >> [your cluster name] >> Nodes >> select your failed server >> Right-click and choose “More action” >> Evict
6. Start the recovery process
Go the directory where setup files are located and run:
setup.exe /m:RecoverServer /IAcceptExchangeServerLicenseTerms
setup.exe /m:RecoverServer /IAcceptExchangeServerLicenseTerms
In most cases, when you use the original exchange installation CD for recovery, you might encounter errors that prompts you to use the later cumulative updated exchange setup files than the ones you have setup. If so, you can find the latest released Exchange CUs here, get the latest CU, extract it to folder and run the setup files again with the switches shown above.
You can also check your current exchange server version with build numbers on good servers in EMS shell by:
[PS] C:\>Get-ExchangeServer | Format-List Name, Edition, AdminDisplayVersion
As the recovery process is fetching info from AD objects and reinstalling the exchange server, you can see the progress in the console.

7) Add to DAG and Re-seeding DB copies
After the servers are recovered, you need to reboot the recovered servers for proper functioning. Then,
a) add the servers back to DAG group.
b) reseed the DB passive copies.
This is quite a simple process and I won’t go details with these.
Congratulation ! Your recovery process is now Successful.
Note: For me, I had some minor issues when reseeding DB with the following errors. So, I had to take additional steps to fix.
ERROR:
The seeding operation failed. Error: An error occurred while performing the seed operation. Error: Unable to delete logs at ‘D:\M datalogs’. The database has been seeded successfully. If any obsolete log files exist, manually delete them to prevent database divergence. Error: System.IO.IOException: The file or directory is corrupted and unreadable. at System.IO.__Error.WinIOError(Int32 errorCode, String maybeFullPath) at System.IO.FileInfo.Delete() at Microsoft.Exchange.Cluster.Replay.DatabaseSeederInstance.DeleteLogFiles(DirectoryInfo di, String logfilePrefix, String logfileSuffix, Int32& logNum) at Microsoft.Exchange.Cluster.Replay.DatabaseSeederInstance.
So, I assume there is some disk corruption in my harddisk. Fortunately, that server has no active database copies, So I manually chkdsk the volume without /r switch. Since some disk errors are found, I use the chkdsk /r /f instead.
C:chkdsk d: /r /f
Then, I reseed the DB again, and another errors come up.
Error:
The seeding operation failed. Error: An error occurred while performing the seed operation. Error: Failed to notify source server ‘[my source server name]’ about the local truncation point. Hresult: 0xc8000713. Error: Unable to find the file.
According to this article , it said that this is the issue with the old logs folder which was not in the sync. And, I did the following procedures:
1) Dismount the Active Copy of the database from EMC console.
2) Find the Database file path and Log file folder path in EMS shell. Let us assume here, edb file path is D:\Databasemydatabase.edb and Log folder path is D:\DatabaseLogs.
[PS]C:>Get-MailboxDatabase mdb04 | fl *path*
3) Login to the source server hosting that database, here ‘[my source server name]’ and you need to run eseutil.exe in elevated command prompt to verify that DB is in clean shutdown state. We have got the DB path & log folder path in step 2.
C:\eseutil /mh D:Databasemydatabase.edb
(If the DB state is clean shutdown, you can continue the next step. If the state is dirty shutdown, you need to go for the recovery process using log files. And this article will help you.)
4) If the DB is clean shutdown state, you can delete all log files in folder path we obtained from step-2. If you are unsure, you can rename the Log folder and delete them later. You can also delete via the following command if there are thousands of log files.
D:\DatabaseLogsrmdir . /s /q
5) Mount the database, this will create new log files.
6) Reseed the database copies.
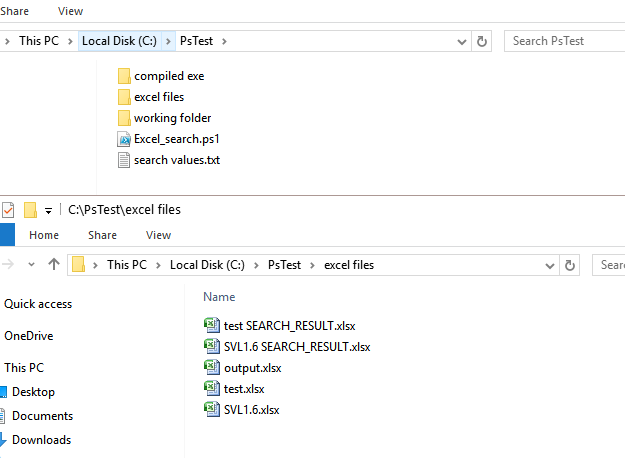
Search Multiple Words in Multiple Excel files using Powershell !
Inventory documentation with Excel is something that most infrastructure administrators have to deal with on a daily basis. Sometimes, I have to search for a bulk of IP addresses in multiple Excel files, but I have to do it by opening the Excel files one by one. After investigating how this can be achieved in PowerShell, I found that using comObject is the way to go, as it can be used to automate most Windows applications. Make sure Microsoft Excel is already installed before you run the script.
How to use the script:
You need to create search values.txt file and insert the contents line-by-line that you want to search. (Also the script will automatically create the search values.txt on the first run if not exists). The output files will have the same names as original files appended with _RESULT.xlsx
Then, open powershell console and run with following necessary parameters. You will need to specify -Folder or -File parameter at least.
Example:
.\Excel_search.ps1 C:\MyExcelFiles -Recurse -Color -OpenFile -Grid
Parameters:
-Folder : The folder name in which multiple Microsoft Excel files should already exist (Use it if the -File is not specified)
-File : The file name of the Microsoft Excel file (Use it if the -Folder is not specified)
-Recurse : Use this with -Folder option to search excel files recursively
-Color : Use this to colorize the values found in the excel files (in darkblue color)
-Grid : Use this to display the summary of search results in grid output windows (See Fig-1)
-OpenFile : Use this to automatically open the output files when the search operation is completed.
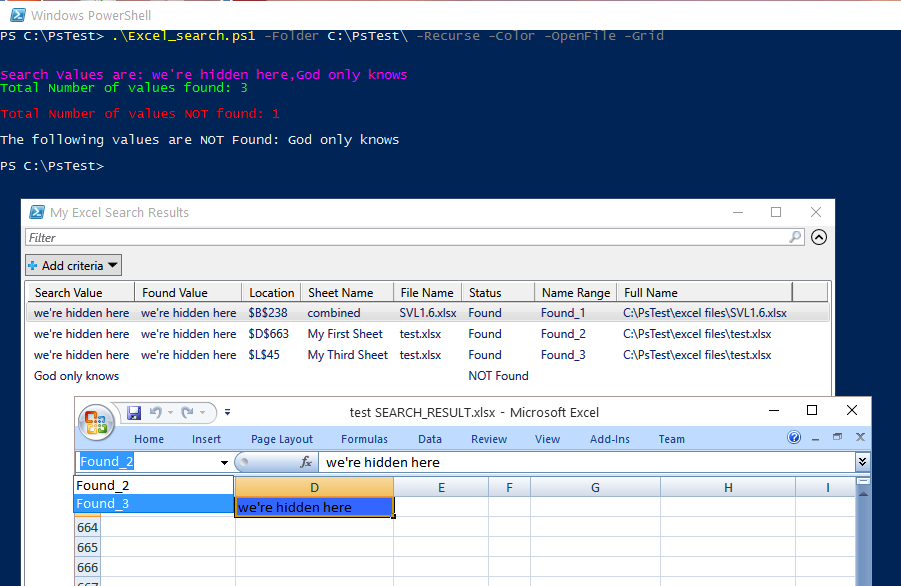
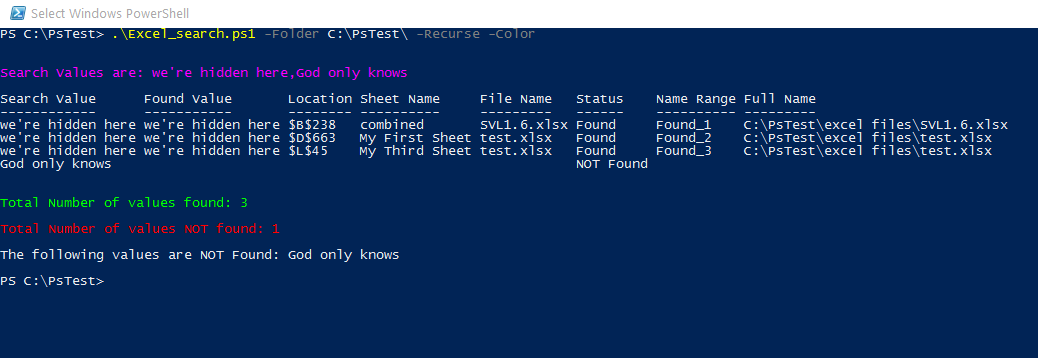
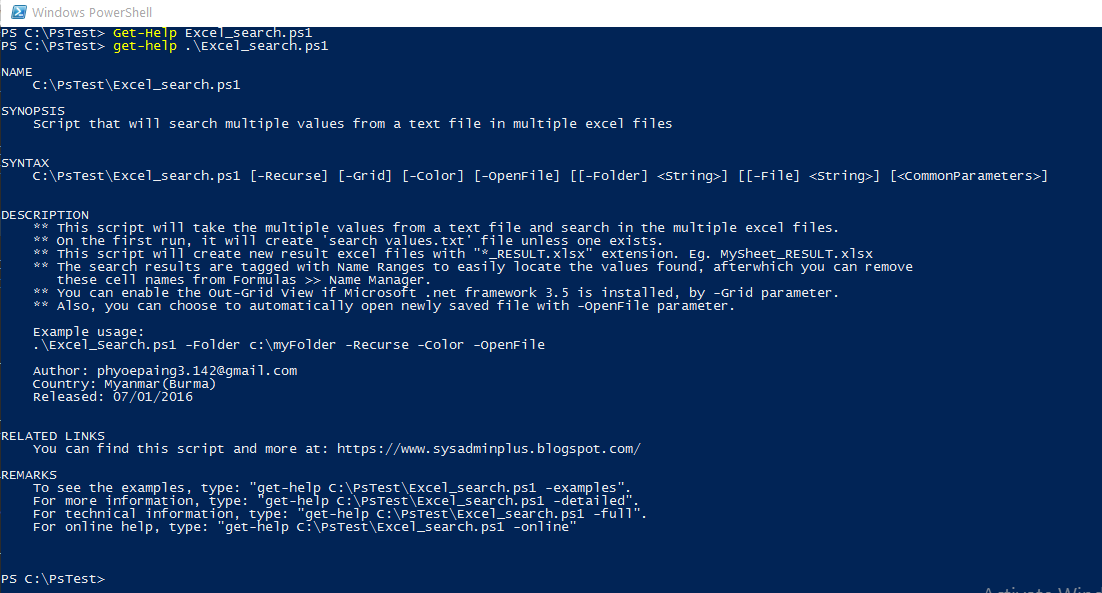
You can download my script from github.
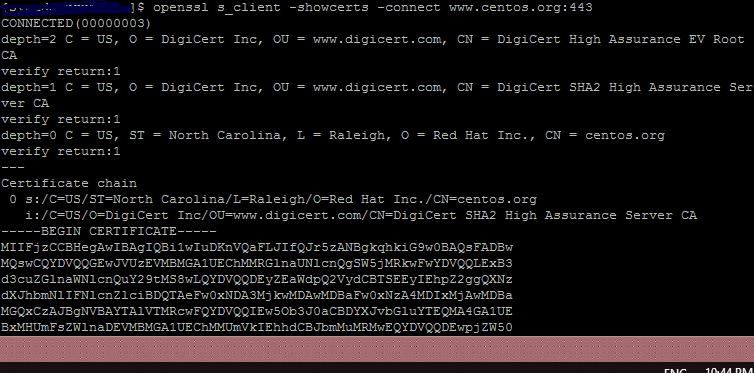
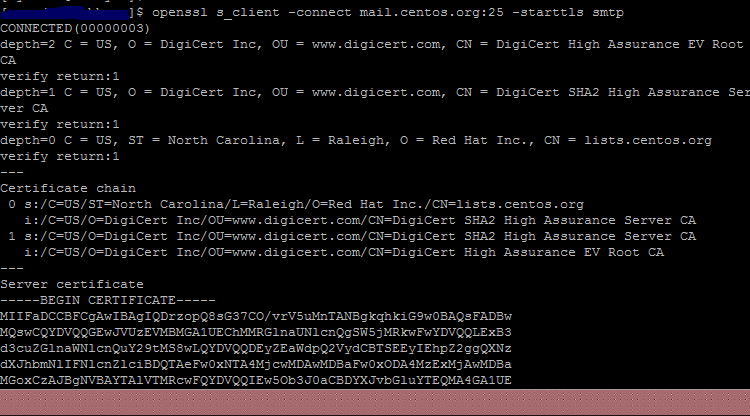
View SSL/TLS Certificate Info with OpenSSL Command
You can simply check the SSL/TLS certificate information which is listening at non-http port (like STMP) by using the OpenSSL tool. All you need to know is to the port that uses encrypted connection. For example, I view the certificate info at CentOS website & TLS certificate used for smtp connection. With WSL, OpenSSL already installed and you’re ready to go.
For example here, I check the CentOS website & TLS certificate which is used for smtp connection.
For SSL connection:
openssl s_client -showcerts -connect www.centos.org:443
For TLS connection:
openssl s_client -connect mail.centos.org:25 -starttls smtp